Attributes of areas
The Pedestrian Area window opens when you insert an area, if the automatic opening of the Edit dialog after object creation is selected (Right-click behavior and action after creating an object).
Into the window, you enter attribute values for the network object. For network objects which have already been defined, you can call the window using the following functions:
- ► In the list of network objects of the network object type, double-click the row with the desired network object.
- ► In the Network editor, select the network object of your choice. Then, on its shortcut menu, click Edit.
The network object may have additional attributes. In the network objects list of the network object type, you can show all attributes and attribute values. You can open the list via the following functions:
- ► On the network object sidebar, right-click the desired network object type. Then on the shortcut menu, click Show List (Shortcut menu in the network object sidebar).
- ► In the Network editor, select the network object of your choice. Then, on its shortcut menu, click Show In List (Selecting network objects in the Network editor and showing them in a list).
- ► On the Lists menu, in the desired category, click the network object type.
In the network objects list of the network object type, you can edit attributes and attribute values of a network object (Selecting cells in lists), (Using lists).
The objects of this object type may have relations to other objects. This is why the attributes list is shown as part of a coupled list (on the left). On the Lists toolbar, in the Relations box, you can show and edit the coupled list with the attributes of the desired relation on the right (see below Showing and editing dependent objects as relation) and (Using coupled lists).

|
Note: In lists, you can use the |

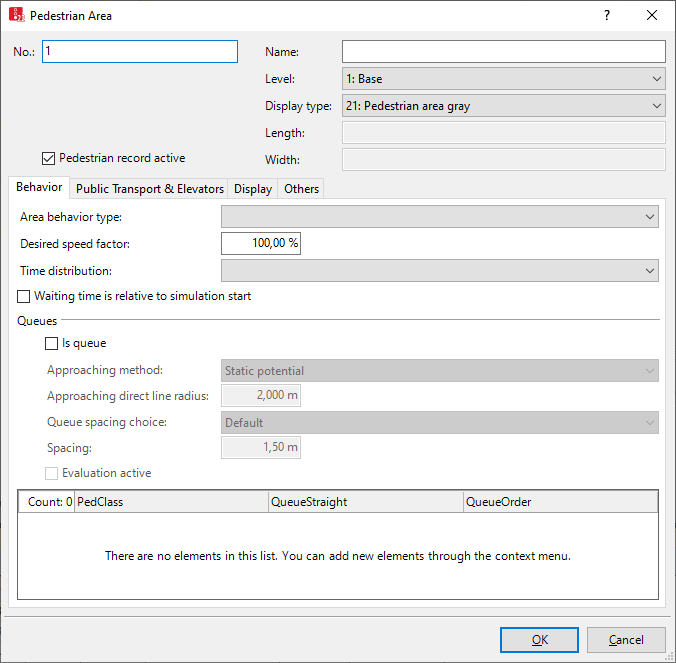
A network object may have the following attributes: These can be shown in the attributes list.
| Element | Description |
|---|---|
|
No. |
Unique number of the area |
|
Name |
Name of area |
|
Level |
Level, if the area for the modeling of multistory buildings is to be on one level (Defining levels) |
|
Display type |
Display type for the colored display of the area (Defining display types) |
|
Only for the rectangle type: |
|
|
Length |
Length of the area [m] |
|
Width |
Width of the area [m] |
|
Pedestrian record active |
Pedestrian record active (PedRecAct):  If this option is selected, the pedestrians in this area are taken into consideration in the pedestrian record (Saving pedestrian record to a file or database). If this option is selected, the pedestrians in this area are taken into consideration in the pedestrian record (Saving pedestrian record to a file or database). |
1. Select the desired tab.
2. Make the desired changes:
Behavior tab
|
Element |
Description |
|---|---|
|
Area behavior type |
Optionally, select an area behavior type (AreaBehavType). Is used to model occasional changes to the speed or other parameter (Modeling area-based walking behavior). If no area behavior type is selected or if an area behavior type has not been assigned a walking behavior, the walking behavior assigned to the pedestrian type is used. |
|
Desired speed factor |
Factor for changing the desired speed of all pedestrians within the area, standard value 100 %, value range 10 % to 300 %. With the desired speed factor you can reduce the desired speed in the respective area, if the pedestrians move slower compared to their original desired speed, for example to take into account traveling on rough terrain or crossing a road very carefully. With the desired speed factor you can increase the desired speed in the respective area, if the pedestrians move faster compared to their original desired speed, for example when they cross a road very quickly. If areas overlap, Vissim applies the following rules to determine the area whose desired speed factor is used:
If an area behavior type is selected for the area, its desired speed is multiplied by the desired speed factor. |
|
Time distribution |
TmDistr: Time distribution is assigned to pedestrians entering the area based on their strategic route. Time distributions in areas with pedestrian input affect pedestrians entering the network in that area. The time distribution does not apply if the area is a waiting area for an elevator group or a waiting area for public transport usage. For pedestrian areas with PT usage of the type Platform edge, you can define a minimum dwell time via the allocation of a time distribution. PT vehicles depart once the minimum dwell time runs out. The PT vehicles depart once all alighting passengers have exited. This also applies for a minimum dwell time = 0. Optionally you can activate the option Late boarding possible for each line stop (Calculating dwell time with PTV Viswalk). |
|
Waiting time is relative to the start of simulation |
WaitTimeIsRelToStartSim: If a time distribution is selected for the area and the pedestrian route has a route location within the area, the pedestrian will be allocated a waiting period from the time distribution as soon as he/she enters the area. The waiting period can refer to the following points in time:
This option cannot be selected, if the Is queue attribute is selected. |
|
Queues section |
|
|
Is queue |
IsQueue: Attribute for the waiting behavior on pedestrian areas which are the destination or intermediate point of a route.
Define the desired queue behavior in the list on the Area Behavior tab for the queue and assign the desired pedestrian class. This option cannot be selected if the Waiting time is relative to the start of simulation attribute is selected. |
|
Approaching method |
Method used to calculate how pedestrians approach the end of a queue.
In queues that Viswalk automatically generates next to PT vehicles and elevators, pedestrians always approach the end of the queue in direct line. |
|
Approaching direct line radius |
QueueApproachingDirectLineRadius: Radius around the current end of the queue within which the method Direct line is used. Outside this radius, the selected queue approaching method is used. Default 2.0 m |
|
Queue spacing choice |
QueueSpcChoice: Principle of selecting the distance between pedestrians in the queue.
|
|
Evaluation active |
Queue Evaluation Active: If this option and the option Is queue are selected, you may output result attributes for the queue (Evaluating pedestrian density and speed based on areas). |
 If this option is not selected, the waiting time refers to time when the pedestrian enters the area.
Behavior within the queue
By default, pedestrians move to the position of the person in front them when they leave their position. For each queue selected for the waiting position approach method Static potential, Viswalk calculates an additional potential as soon as the simulation is started. This potential shows at the beginning of the queue. It becomes effective each time you update the queue. The distance to the person in front of each pedestrian in the queue is calculated. If the distance is greater than 2 meters, pedestrians do not move up in the queue in direct line, but in walk mode according to the new potential. This mode ends as soon as the pedestrians are closer than 2 meters to the person in front of them. Then pedestrians move up in the queue in direct line again. This procedure allows for a more realistic moving up in line of the pedestrians, particularly when queues are angled, for example in front of a desk at the airport, where shut-off systems are used to create a zigzag queue.
If another pedestrian is already standing at a pedestrian’s destination position, for example at the front of a queue, the pedestrian at the end of the queue will have a slightly different waiting position.
Define queue behavior and assign pedestrian class
1. In the Area Behavior tab, activate the Is queue option.
2. Right-click in the list.
3. On the shortcut menu, click Add.
A new line for the pedestrian class with the lowest number is added.
4. Make the desired changes:
|
Element |
Description |
|---|---|
|
PedClass |
Select the pedestrian class for which the queue order and/or the queue straightness needs to be defined |
|
QueueStraight |
The Queue straightness defines the shape of the queue, with values between 0.0 and 1.0. The greater the value, the more straight the queue will look:
If no waiting behavior is defined for this waiting area, the attribute applies to all elevators of the elevator group, to all floors and all pedestrian classes. Default values are defined in the network settings (Selecting network settings for pedestrian behavior). They are used if this attribute is not defined for the elevator group. Using the coupled list Queuing behavior, you can limit the shape of the queue to the desired pedestrian classes, and for the selected pedestrian classes, define the queue shape. The Is queue attribute of the area must be selected. |
|
QueueOrder |
The Queue order defines the orderliness of the queue formed by pedestrians, with values between 0.0 and 1.0. The higher this value, the more orderly pedestrians line up one behind the other:
If no waiting behavior is defined for this waiting area, the attribute applies to all elevators of the elevator group, to all floors and all pedestrian classes. Default values are defined in the network settings (Selecting network settings for pedestrian behavior). They are used if this attribute is not defined for the elevator group. Using the coupled list Queuing behavior, you can limit the orderliness of the queue to the desired pedestrian classes, and for the selected pedestrian classes, define the orderliness. The Is queue attribute of the area must be selected. |
PT & Elevators tab
PT section
|
Element |
Description |
|---|---|
|
Usage |
Usage of area in PT:
As soon as you allocate public transport usage with the attribute Waiting area or Platform edge and a public transport stop with the attribute for public transport stop(s) to the area, Vissim checks whether boarding volumes are defined for this stop. If no boarding volumes are defined, Vissim enters default data in the Public transport stop window on the Boarding volumes tab. |
|
for PT stop(s) |
Allocating one or more public transport stops to the area. The area must be a Waiting area or a Platform edge. As soon as you select a PT stop and confirm the entries with OK, Vissim changes the following data of the PT stops affected (Attributes of PT stops):
|
|
Boarding passenger choice |
Only relevant for areas with Waiting area usage to which several stops are assigned. When boarding passengers enter the public transport waiting area, they choose either the public transport line only or the public transport line and stop from which they board for boarding the next vehicle:
|
|
Waiting position distance distribution |
DistPTWaitPosDistr: Distance distribution for waiting position selection when pedestrians enter the area. Under the attribute Usage , the option Waiting area must be selected for the area. The pedestrians are not distributed evenly across the area, but with different levels of density. The area attribute Waiting area minimum spacing is taken into account. Pedestrians avoid parts of the area where density is too high and then disperse to other parts. For example, you can model different distance to PT waiting position distributions, depending on access to the platform. To do so, place attribute decisions at the access points that set an individual distance to PT waiting position distribution for each pedestrian. In the attribute decision, you can also create a formula that selects a distance distribution and assigns it to a pedestrian type or class. |
|
Boarding location |
As a standard, for pedestrian areas with Public transport usage for the Boarding location the option Nearest door is used. Alternatively, for the door selection when boarding, you can allocate a location distribution after the queuing boarding passengers have distributed for the boarding at the doors of the PT vehicle (Using location distributions for boarding and alighting passengers in PT). |
Elevators section
|
Element |
Description |
|---|---|
|
Waiting area for elevator group |
ElevGrp: Elevator groups whose elevators take the area into account. When a pedestrian enters a waiting area that includes a route location of their route, an elevator is requested depending on the subsequent route location. |
PT & Elevators section
| Element |
Description |
|
|---|---|---|
|
Waiting behavior |
PTWaitBehav: Waiting behavior of pedestrians in public transport or elevator waiting areas:
|
|
|
Waiting position approach method |
Method according to which pedestrians in a waiting area move towards a waiting position
|
|
|
Waiting area minimum spacing |
WaitAreaMinSpc: Minimum spacing between pedestrians within the waiting area as long as there is sufficient free space. Default 0.00 m If the waiting area is too small for the entered minimum spacing, Viswalk falls below the minimum spacing. |
|
|
|
Note: If, at a public transport stop at least one pedestrian area is defined as a Waiting area or Platform edge, Vissim assumes that the boarding/alighting at this public transport stop is calculated during the simulation and that the dwell time should not only be determined numerically regarding the number of boarding/alighting passengers. The difference becomes visible in the window PT Line Stop: The content of the window changes as soon as a pedestrian area is defined as a Waiting area or Platform edge (Editing a PT line stop). |
Display tab
3D section
| Element | Description |
|---|---|
|
z-offset |
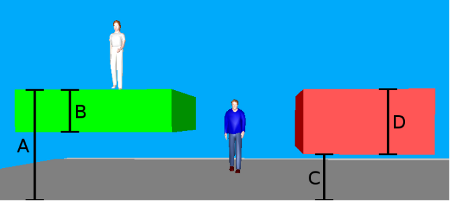
Z-offset: Vertical offset > 0.000 along the z axis up to the specified edge for the 3D display of the area. z = 0 is the floor on which the pedestrians walk (A in the figure below)
|
|
Thickness |
Thickness of area for the 3D display (B in the figure below). Not relevant for the simulation. Thickness > 0 for an area reduces the clearance displayed below the area in the 3D view because the thickness of the ceiling is not considered when calculating the length of the opening or the ramp foot from the clearance height.
Area left (green): A = offset top, B = thickness Obstacle right (red): C = offset bottom, D = height |
Visibility section
| Element | Description |
|---|---|
|
Individual pedestrians |
(ShowIndivPeds): This option is considered if the pedestrian attribute Show individual pedestrians is selected.
|
|
Show classified values |
Classified values ShowClsfValues: This option is considered if the pedestrian attribute Show classified values is selected. Then the global LOS scheme for this area can be ignored for the area-based LOS display (Using LOS schemes for showing aggregated pedestrian values).
|
|
Label |
|
Others tab
Usage in pedestrian OD matrix
|
Always use as origin area |
AlwUseAsOrig: Origin areas are considered to be origins (rows) in the pedestrian OD matrix (Selecting origins and destinations in the Pedestrian OD Matrix).
|
|
Always use as destination area |
AlwUseAsDest: Destination areas are taken into account as destinations (columns) in the pedestrian OD matrix (Selecting origins and destinations in the Pedestrian OD Matrix).
|
Showing and editing dependent objects as relation
The attribute and attribute values of this network object type are shown in the list on the left, which consists of two coupled lists.
1. In the list on the left, click the desired entry.
The list on the right contains attributes and attribute values of network objects, and/or base data allocated to the network object selected in the list on the left (Using coupled lists):
- Pedestrians: Pedestrians within the area. The evaluation may reduce simulation speed.
- Pedestrian routes (static) (Attributes of static pedestrian routes)
- Pedestrian routing decision (static) (Attributes of static routing decisions for pedestrian routes)
- Static pedestrian route locations (Attributes of pedestrian route locations)
- Static pedestrian route destinations (Attributes of pedestrian route locations)
- Pedestrian routes (partial) (Attributes of partial pedestrian routes)
- Pedestrian routing decision (partial) (Attributes of partial pedestrian routing decisions)
- Partial pedestrian route locations (Attributes of pedestrian route locations)
- Partial pedestrian route destinations (Attributes of pedestrian route locations)
- Pedestrian inputs (Attributes of pedestrian inputs)
- Public transport stops (Attributes of PT stops)
- Points: edit coordinates of the corners
- Queuing behavior: The Public transport waiting behavior is described further above.
2. On the list toolbar, in the Relations list, click the desired entry.
3. Enter the desired data.
The data is allocated.
Superordinate topic:
Modeling construction elements
Information on editing:
Importing walkable areas and obstacles from AutoCAD
Importing Building Information Model files
Defining construction elements as rectangles
Defining construction elements as polygons
Defining construction elements as circles
Editing construction elements in the Network Editor
