Selecting attributes and subattributes for columns of a list
You can specify the content and display for the attribute list of a network object type in the attribute selection window <Name Network object type: Select Attributes> in the attribute selection list:
- the attributes displayed in columns
- the sequence of the columns
- the alignment of the attribute value in the table field
- whether the unit is displayed
- number of decimal places if the attribute value is a numerical value with decimal places
- formatting if the attribute value has a unit
You can also define an alias for an attribute, change the name of the alias or delete the alias (Editing aliases in the Attribute selection list).
Finding searched attributes or subattributes in the attribute selection window
Network object types can have many attributes and subattributes. Therefore, the list of attributes or subattributes can be long. To quickly find the attribute or subattribute you are looking for, you can enter the name of the attribute or subattribute in the search box in the attribute selection window. This limits the number of matching entries.
1. On the toolbar, click the Attribute selection button  .
.
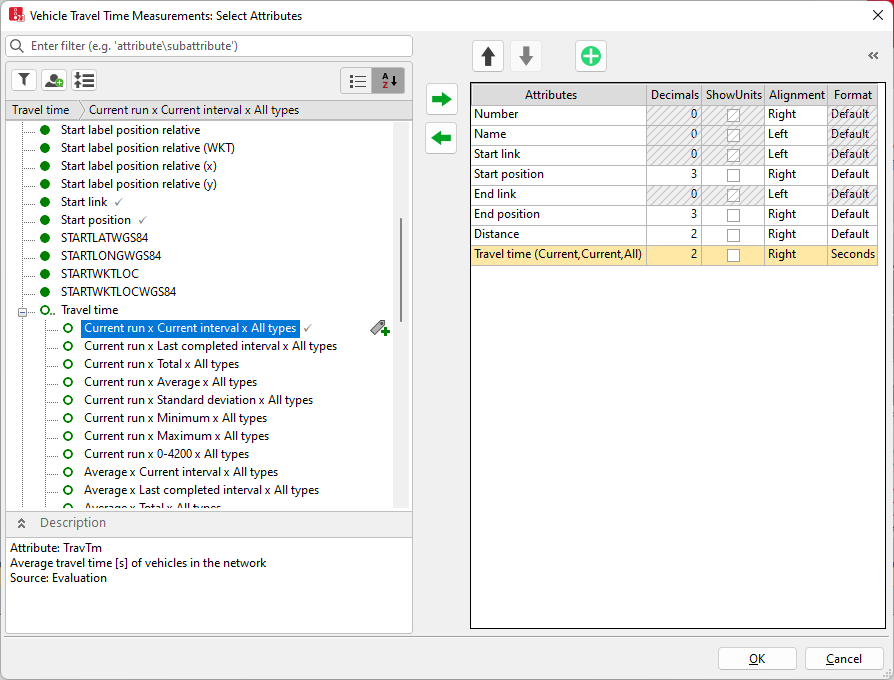
The attribute selection window <Name Network object type>: Select Attributes opens.
On the left side, the search box is displayed at the top:  . The field below displays the attributes and subattributes of the network object type.
2. Enter the name of the attribute or subattribute in the search box.
If you know the exact name of the attribute and that of the subattribute, you can enter them one after the other and separate them with the '\' character, for example Level\Name.
The list is narrowed down to matching entries.
Specifying an attribute or subattribute as a column
1. On the toolbar, click the Attribute selection button .
The attribute selection window <Name Network object type>: Select Attributes opens.
On the right, the program indicates the attributes and their formats for each column in the list.
You can edit the data in the rows of the list on the right. The changes are accepted in the columns of the list, when you click OK to close the <Name Network object type>: Select Attributes window.
The attributes, which you can display as columns in the list, are displayed in an Explorer pane on the left, in alphabetical order of the attributes' long names. Symbols indicate the properties of the attributes:
| Symbol | Description |
|---|---|
|
|
Circle, green, filled: attribute without subattribute |
|
|
Circle, green, filled, with two ellipsis points: attribute, for which you must select at least one subattribute |
|
|
Ring, green: attribute without subattributes that only has values during a simulation run |
|
|
Ring, green with two ellipsis points: attribute for which you must choose at least one subattribute and that only has values during a simulation run |
|
|
User-defined attribute |
|
|
User-defined: attribute, without subattributes, that only has values during a simulation run |
|
|
Alias of an attribute (Using aliases for attribute names) |
|
|
Alias for an attribute that only has a value during a simulation run |
|
|
Indirect attribute of a corresponding network object: The network object has exactly one network object belonging to it in the respective category. You can edit the indirect attribute if the target object can be edited. |
|
|
Indirect attribute of a corresponding network object: The network object either has or does not have a network object belonging to it in the respective category |
|
|
Indirect attribute of a corresponding network object: The network object has many corresponding network objects in the respective category. This is summarized with aggregation functions. |
|
|
Aggregation function |
|
|
Scenario comparison <Name Scenario> under attribute Exists in scenario: In the scenario currently open, network objects of this type have relations to a scenario selected for comparison whose network has been opened in the background (Comparing scenarios of the scenario management). |
|
|
Scenario comparison <Name Scenario>: Contains attributes, from which you can select subattributes of scenarios for scenario comparison and add them to the list (Selecting attributes for scenario comparison) |


For 0..n relations, the following aggregation functions are provided  :
:
|
Count |
Determine the number of associated network objects. |
|
Min |
Determine the minimum value of all associated network objects for the selected attribute. |
| Max |
Determine the maximum value of all associated network objects for the selected attribute. |
|
Sum |
Determine the total of the values of all associated network objects for the selected attribute. |
|
Average |
Determine the mean of the values of all associated network objects for the selected attribute. |
|
Concatenate |
String all values of the associated network objects together for the selected attribute. |
|
Histogram |
Contrary to the Concatenate aggregate function, each occurring value is issued only once along with the frequency of its occurrence. |
|
Distinct |
Contrary to the Histogram aggregate function, each occurring value is issued only once regardless of the frequency of its occurrence. |
| Compare |
Shows a value that is the same in the related network objects. |
|
First |
Displays the value of the selected attribute for the network object with the lowest number. |
|
Last |
Displays the value of the selected attribute for the network object with the highest number. |
|
ExactlyOne |
Displays the value of the selected attribute if there is exactly one network object. |
All network objects have a reference to the Network object.. This allows aggregation of attribute values of all objects of the network object.
2. If desired, filter the displayed subattributes (Setting a filter for selection of subattributes displayed).
3. Repeat the following steps for all attributes that you want to show in the list:
4. In the section on the left, select the attributes of your choice:
|
Select one attribute |
|
|
Select several individual attributes |
|
|
Select multiple contiguous attributes |
|
Below the Explorer, the Description field displays the following information for the selected attribute:
- Short name
- Source:
- Input attribute: The attribute value can be edited
- Evaluation: Result attribute obtained from simulation
5. Click the ![]() button.
button.
Each attribute selected on the left is listed on the right in an additional row. You cannot edit hatched cells or the attribute name. The sequence of the rows in the section on the right defines the sequence of the columns in the attribute list.
6. If required, in the section on the right, edit the properties for display of the attribute values and the sequence of the rows.
7. Confirm with OK.
Structure of aggregated result attributes
If aggregated attribute values refer to the simulation run, time interval and object, they are also displayed in this order, for example for the network object Parking lots and its attribute Number of vehicles leaving: Minimum x Minimum x All types:
The first value refers to the simulation runs, for example Current Run, Avg value, Minimum or Maximum
The second value refers to the time intervals, for example Current interval, Avg value, Standard deviation, Minimum or Maximum
The third value refers to the characteristic of the object, for example, All types refers to all vehicle types.
Aggregation function with condition
In user-defined attributes, you can additionally specify a condition in a formula for relations (that reference multiple objects) in the aggregation function. As a result, only the objects that meet this condition are output and aggregation is performed via these objects.
The condition is entered in round brackets after the aggregation function.
The attribute of the network object to which the relation references is enclosed in square brackets.
Examples
Average spacing between vehicles of vehicle type 100 on a link:
[AVG:VEHS([VEHTYPE\NO]=100)\SPACING]
Average clearance between vehicles of vehicle type 200 on a link:
[AVG:VEHS([VEHTYPE\NO]=200)\CLEAR]
Sum of the width of the lanes on a link used by the vehicles:
[SUM:LANES([COUNT:VEHS]>0)\WIDTH]
Editing properties for displaying attribute values
Each attribute selected on the left is listed on the right in an additional row. You cannot edit hatched cells or the attribute name.
1. Click the cell of your choice.
2. Make the desired changes:
| Column | Description |
|---|---|
| Attribute |
Attribute name |
| Decimals |
Number of decimal places. This is also possible with integer result attributes, which allows you to set the desired precision of the aggregated parameters.Mean and Standard deviation. |
| ShowUnits |
|
| Alignment |
vertical alignment of the attribute value in the list |
| Format |
Unit of the attribute value |
 If this option is selected, in the list, next to the attribute value, the unit is displayed that has been selected in the
 3. If you do not wish to change the view or the arrangement of the rows in the section on the right, confirm with OK.
Fast access to last selected attributes
As soon as you transfer an attribute from the left list to the right list, below the left list, the Fast access section is shown displaying this attribute. In the Fast access section, a maximum of five previously selected attributes is displayed. The attributes last selected within the last hour are listed at the top.
Editing rows in the right pane
You can edit the entries of the right table with various standard functions, for example duplicate.
1. Right-click on the line you want to edit.
2. On the shortcut menu, click the desired entry.
Defining the sequence of columns in the attribute list
1. In the section on the right, select the desired row.
2. To select further rows, hold down the Ctrl key and click the other rows of your choice.
3. Click the desired button:
| Button | Description |
|---|---|
|
|
Moves rows up and moves columns in list to the left |
|
|
Moves rows down and moves columns in the list to the right |


Functions of the symbols in the attribute selection list
| Button | Description |
|---|---|
|
|
Adds the attributes selected in the Explorer on the left as rows to the section on right and as columns to the list. |
|
|
Adds the subattributes, including those from other scenario comparisons, selected in the Explorer under |
|
|
Adds the predefined group attributes displayed in the Explorer on the left as rows to the section on right and as columns to the list:
|
|
|
Deletes the rows selected on the right and the corresponding columns of these attributes from the list. |
|
|
Systematic sorting: Sort attribute list: The most frequently required attributes are listed at the top of the list and indirect attributes at the bottom. |
|
|
Alphanumerical order: Sort the attribute list alphanumerically and in the following order:
|
|
|
Insert user-defined attribute: Open the User-defined attribute window and define an attribute for the selected network object type (Creating user-defined attributes). The user-defined attribute is displayed in the section on the left. |
|
|
Filters (Setting a filter for selection of subattributes displayed) |


4. Confirm with OK.
The columns are adjusted in the list.
Edit aliases
In the Explorer, in the attribute list on the left, move your mouse pointer to an entry to insert, edit or delete an alias (Editing aliases in the Attribute selection list), (Using aliases for attribute names).
|
|
Add alias, Edit alias, Delete alias (Editing aliases in the Attribute selection list) |
|---|


Copy short name
You can copy the short name of an attribute in the attribute selection window to the clipboard. Corresponding relations, aggregate functions and subattributes are also copied. You can paste the copied data into a COM script in a text editor, for example.
5. Right-click the entry of your choice.
6. On the shortcut menu, click Copy short name.
