In the graphical timetable, you can make settings for the display of active, passive, and marked vehicle journeys on separate tabs each. The uniform display and the classified display are only available for active vehicle journeys.
Specifying the header text
Each displayed vehicle journey can be labeled with a Header text which is positioned right above the first vehicle journey item. The text can be any vehicle journey attribute, such as the vehicle journey number.
1. From the Timetable (graphical) menu, choose Edit graphic parameters.
The Edit graphic parameters: Timetable (graphical) window opens.
2. Select the page Vehicle journeys > Header text.
3. Make the desired changes.
|
Element |
Description |
|
Uniform display |
If the option has been selected, all header labels are displayed uniformly. Select option Draw text and make further changes. |
|
Classified display |
If the option has been selected, you can classify and display the header text by an attribute (Displaying classified objects based on attribute values). |
|
Display |
In this section, you can specify the following settings for the header text: Draw text If the option has been selected, a header text will be displayed. Draw until scale
Slanted text If the option has been selected, the text is not displayed horizontally, but as slanted text. |
|
Text |
In the Text section, you can specify the display of the header text. Content Use this button to select a vehicle journey attribute in a separate window for the header text (Selection of attributes). Size Text size in mm Font You can specify the font and the style in a separate window by clicking in the field. Transparent If the option has been selected, the text is displayed without the white background, as text only. Color In a separate window, you can specify a color for the header text by clicking in the field. Frame If you select this option, the header text will be framed. You can specify a color for the frame if you click in the field. Round Rounding factor for the attribute values Decimal places Enter the number of decimal places for the display of the attribute values. Note The option is only available for numerical attributes of the type floating-point number. |
 If the option has been selected, the text will be drawn up to the set scale when zooming out
  If the option has not been selected, the text will always be displayed, irrespective of the network scale.
4. If required, in the same way, edit the settings for passive and marked vehicle journeys in the respective tab.
|
Note: If you click the Preview button, your changes show immediately without the Edit graphic parameters window being closed. |
5. Confirm with OK.
The header text is displayed according to your settings.
Setting the line style properties
You can specify the line style properties for vehicle journeys, i.e. the line style that will be used to show vehicle journeys.
1. Select the Vehicle journeys > Line style properties page.
2. Make the desired changes.
|
Element |
Description |
|
Uniform display |
If the option has been selected, all vehicle journey items are displayed uniformly. In the Draw object section and make further changes. |
|
Classified display |
If the option has been selected, you can classify and display the line display by an attribute (Displaying classified objects based on attribute values). |
|
Note: If you click the Preview button, your changes show immediately without the Edit graphic parameters: Timetable (graphical) window being closed. |
3. Confirm with OK.
The line is displayed according to your settings.
Setting the line style
You can specify the line style of vehicle journeys.
1. On page Vehicle journeys > Line style properties, click in the Line style field.
The Line style parameters window opens.

2. Make the desired changes.
|
Element |
Description |
|
Overall preview |
Here you can see the display of all layers together. |
|
Dashed line layer |
Here you can see the individual layers which are drawn on top of each other. Notes Via the |
|
Line style properties |
Here you can specify settings for the individual layer when clicking the desired layer in the list. Preview current layer Here you can see how the line will be drawn. Width Line width in mm. Color In a separate window, you can specify a color for the respective line by clicking in the field. |
|
Dash pattern |
The dash pattern is composed of individual square units that determine the lengths and the distance of the displayed points or lines. You can specify a user-defined line style by moving the indicator along the scale and checking individual units. Alternatively, you can select a dash pattern template. Notes Active units (black) are displayed as points or lines in the selected color and line width. Inactive units (white) are transparent and indicate the distance between two points or lines. The length of an individual line or a distance is based on the number of units per line or distance • width of a single element. A line consisting of four units, for example, will be displayed at a length of 4 mm in the network display if the width of the element is 1 mm. The height of each unit is determined by the set line width (=Width). Length of an item Enter the length of each unit in mm. Note The indicator determines the total length of the pattern (= number of units • width of the element). Load dash pattern from template Via this button, the Dash pattern templates window opens. In this window, you can select a template for the line display. Note The user-defined dash pattern will be overwritten if you select a template. Line width and line color remain unchanged. |
 and
and  buttons, you can insert or delete single layers. Via the
  and
and  buttons, you can edit the order in which the layers are drawn.
 3. If required, in the same way, edit the settings for passive and marked vehicle journeys in the respective tab.
4. Confirm with OK.
The line style is displayed according to your chosen settings.
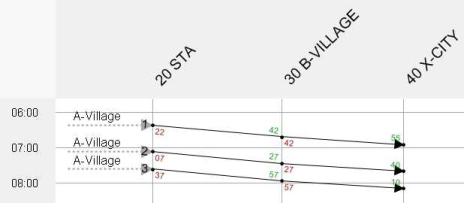
Displaying departure and arrival times
In addition, you can display Departure and arrival times (or any other vehicle journey attribute) before and past each stop. By default, the departure minute is displayed in red and the arrival minute in green.
1. Select page Vehicle journeys > Departure and arrival times.
2. Make the desired changes.
|
Element |
Description |
|
Uniform display |
If the option has been selected, all times are displayed uniformly. Select the Draw option and make further changes. |
|
Classified display |
If the option has been selected, the display can be classified by an attribute (Displaying classified objects based on attribute values). |
|
Display |
In this section, you can specify the following settings for the display: Draw If the option has been selected, the selected attribute will be displayed at stops. Use vehicle journey items text format If the option has been selected, the formats specified under Item labels will be applied. Draw until scale
|
|
Dep. times/arrival times |
The parameters of the two tabs are identical. In both, you can specify the following settings in the Draw text section: Content Use the button to select a vehicle journey attribute for the label in a separate window (Selection of attributes). By default, the Departure Minute or the Arrival Minute is selected. Size Enter the desired text size in mm Font You can specify the font and the style of the label in a separate window by clicking in the field. Transparent If the option has been selected, the text is displayed without the white background, as text only. Color In a separate window, you can specify a color for the label by clicking in the field. Frame If you select this option, the labels will be framed. You can specify a color for the frame if you click in the field. Round Enter a rounding factor for the attribute values Decimal places Enter the number of decimal places for the display of the attribute values. Note The option is only available for numerical attributes of the type floating-point number. |
3. If required, in the same way, edit the settings for passive and marked vehicle journeys in the respective tab.
|
Note: If you click the Preview button, your changes show immediately without the Edit graphic parameters window being closed. |
4. Confirm with OK.
The arrival and departure times are displayed according to your settings.
Displaying journey item symbols
Vehicle journey items can be displayed by symbols. You can select a symbol and specify further settings.
1. Select page Vehicle journeys > Journey item symbols.
2. Make the desired changes.
|
Element |
Description |
|
Uniform display |
If the option has been selected, all symbols are displayed uniformly. Select the Draw symbol option and make further changes. |
|
Classified display |
If the option has been selected, the display can be classified by an attribute (Displaying classified objects based on attribute values). |
|
Display |
Draw symbol If the option has been selected, vehicle journey items are displayed by the selected symbol. In the Draw symbol section, you can specify, which symbol will be displayed and specify further settings. Size Symbol size in mm Color In a separate window, you can specify a color for the symbol by clicking in the field. Show character If you select the Circle or Square symbol, you can activate the input field by checking the box. In the input field, you can enter a sign which will be displayed inside the circle or square. You can specify the color of the GPS signal in a separate window by clicking in the color field. |
3. If required, in the same way, edit the settings for passive and marked vehicle journeys in the respective tab.
|
Note: If you click the Preview button, your changes show immediately without the Edit graphic parameters window being closed. |
4. Confirm with OK.
The symbols are displayed according to your settings.
Hidden starts/ends of vehicle journeys
Vehicle journeys which start or end at a hidden stop can be provided with an auxiliary line at the first/last visible stop at the beginning or at the end of that vehicle journey.
1. Select page Vehicle journeys > Hidden starts/ends of vehicle journeys.
2. Make the desired changes.
|
Element |
Description |
|
Uniform display |
If the option has been selected, all items are displayed uniformly. Select the Draw option and make further changes. |
|
Classified display |
If the option has been selected, the display can be classified by an attribute (Displaying classified objects based on attribute values). |
|
Display |
In this section, you can specify the following settings for hidden starts/ends of vehicle journeys: Draw If the option has been selected, hidden starts/ends will be drawn. Draw until scale
|
|
Trip start/Trip end |
The parameters of the two tabs are identical. In both, you can make the following changes: Draw If the option has been selected, the respective auxiliary lines and arrow heads will be drawn. Auxiliary line In this section, you can specify the display of the line as well as the length in mm. The setting parameters of the line correspond to those of the frame line of the print frame (Setting the print frame). Arrow head In this section, you can specify the color and the size of the arrow head. Draw: Label If the option has been selected, a label is drawn for the hidden stop events. In the Draw label section, you can specify the following settings: Content Use the button to select a vehicle journey attribute for the label in a separate window (Selection of attributes). Size Text size in mm Font You can specify the font and the style of the label in a separate window if you click in this field. Transparent If the option has been selected, the text is displayed without the white background, as text only. Color In a separate window, you can specify a color for the label by clicking in the field. Frame If you select this option, the labels will be framed. You can specify a color for the frame if you click in the field. Round Rounding factor for the attribute values Decimal places Enter the number of decimal places for the display of the attribute values. Note The option is only available for numerical attributes of the type floating-point number. |
3. If required, in the same way, edit the settings for passive and marked vehicle journeys on the respective tab.
|
Note: If you click the Preview button, your changes show immediately without the Edit graphic parameters window being closed. |
4. Confirm with OK.
The beginnings and ends of the vehicle journeys are displayed according to your settings.
Specifying twin stop events
You can specify how to display twin stop events.
1. Select page Vehicle journeys > Twin stop events.
2. Make the desired changes.
3. If required, in the same way, edit the settings for passive and marked twin stop events in the respective tab.
|
Note: If you click the Preview button, your changes show immediately without the Edit graphic parameters window being closed. |
4. Confirm with OK.
The twin stop events are displayed according to your settings.
Specifying course item labels
You can label vehicle journeys with course item data. For each item, a label can be issued for any vehicle journey item attribute. It will then be displayed at every stop-stop section.
1. Select page Vehicle journeys > Course item labels.
2. Make the desired changes.
|
Element |
Description |
|
Layer vehicle journey items label |
If the option has been selected, the vehicle journey items are labeled. |
|
Display identical texts together |
If the option has been selected, adjacent vehicle journey item labels with the same text are displayed together. |
|
Grouped texts |
Placing the text in common You can either display grouped texts At the first item or In the middle of the group. Dividing line If the option has been selected, a dividing line of the specified Length and Color will be displayed between sections with the same label. |
3. Select the page Vehicle journeys > Course item labels > Course item label.
4. Make the desired changes.
|
Note: The parameter settings are identical to those of the header text (Specifying the header text). |
5. If required, in the same way, edit the settings for passive and marked vehicle journeys in the respective tab.
|
Note: If you click the Preview button, your changes show immediately without the Edit graphic parameters window being closed. |
6. Confirm with OK.
The course item labels are displayed according to your settings.
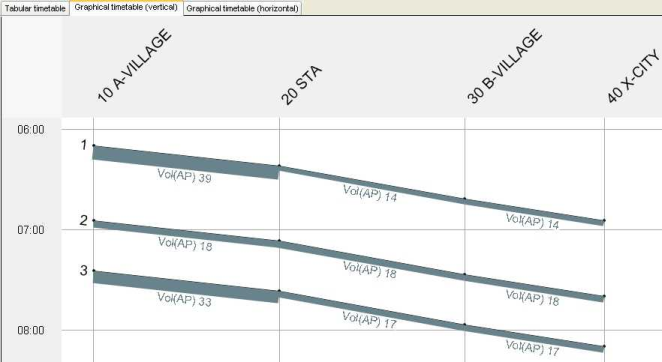
Specifying bars displayed for vehicle journey items
You can display the attributes of vehicle journey items between two stop events as bars along the the vehicle journey items.
|
Note: The program thus offers another possibility of displaying item attributes, namely in the form of bars, in addition to vehicle journey item labels and arrival and departure time labels. |
|
Note: If you want to display volumes of vehicle journeys along the course, you need to select the Additionally for vehicle journeys options under Save volumes on the PuT settings > Assignment page of the General procedure settings window before calculating a PuT assignment (Setting and calculating PuT assignment parameters). |
You can specify and display bar labels for item bars.
1. In the navigator, select the Vehicle journeys > Course item bars entry.
2. Select the Layer control tab.
3. Make the desired changes.
|
Element |
Description |
|
Bar layer |
If the option has been selected, bars and their labels are displayed at vehicle journey items. |
|
Draw bars |
If the option has been selected, bars are displayed at vehicle journey items. Note On tab Bar selection, you can reduce the display of the bars to active vehicle journey items. |
|
Draw bar labels |
If the option has been selected, bar labels can be displayed at vehicle journey items. |
4. Select the General settings tab.
5. Make the desired changes.
|
Element |
Description |
|
Distance between bars |
Distance between the course item bars in mm |
|
Text positioning: vertical |
Next to bar If the option has been selected, the label is displayed next to the bar. Within bar If the option has been selected, the label is displayed within the bar. Text distance Distance of labels in mm Note If the Next to bar option is selected, the distance to the bar is displayed. If the Within bar option is selected, the distance to the link is indicated. |
6. Select the Text format tab.
7. Make the desired changes.
|
Element |
Description |
|
Font and color |
Font You can specify a Font and a Style in a separate window by clicking in the field. Font size Text size in mm Note If the text size is 0.0 mm, no bar label is issued. Label color = bar fill color If the option has been selected, the text is displayed in the same color as the bar. Tip We recommend this option if several bars are displayed. If the option has not been selected, you can select a color in the drop-down list. Uniform label color In a separate window, you can specify a color for the label by clicking in the field. |
|
Text entry |
Transparent If the option has been selected, the bar label is displayed without the white background, as text only. Draw frame If the option is selected, the label is drawn with a frame. From the selection list, you can select the color. Alignment You can specify the alignment and the display of several bar labels via the drop-down list:
The labels are displayed in a row.
The labels are displayed one below the other.
All labels are displayed one below the other and underneath, the sum of the values is displayed.
Only the values of the sum are displayed.
Line distance in percent of the current text size |
8. Select the Bar selection tab.
9. Make the desired changes.
|
Element |
Description |
|
Draw bars only on active vehicle journey items |
If the option has been selected, bars are not drawn at passive vehicle journey items. |
For the vehicle journey items, bars are always displayed and the basic settings are specified.
10. Select the Course item bars > Display page.
11. Insert the desired bars (Defining one or multiple bars).
12. Specify the desired display settings for the bars (Setting the display properties of a bar).
|
Note: Course item bars can be of the type standard bar or difference bar. |
13. Confirm with OK.
The course item bars are displayed according to your settings.
