You can display reached and missed connecting journeys for a selected vehicle journey item in the tool window Connecting journeys. It displays connecting journeys that lie within a definable time window (Settings for decimal places, aggregation functions, and connecting journeys).
1. Make sure the Timetable (graphical) window is open (The graphical timetable window).
2. Make sure that the desired line selection and stop sequence is selected (Selecting lines to be displayed in the timetable and Selecting the stop sequence for the timetable).
3. With the mouse pointer, mark the vehicle journey item in the graphical timetable for which you want to display connecting journeys.
The mouse pointer is displayed together with a grid icon  .
.
4. Right-click and choose Connecting journeys from the shortcut menu.
The Connecting journeys window opens.
|
Tip: Alternatively, you can open the Connecting journeys window via menu View > Tool windows entry Connecting journeys. |
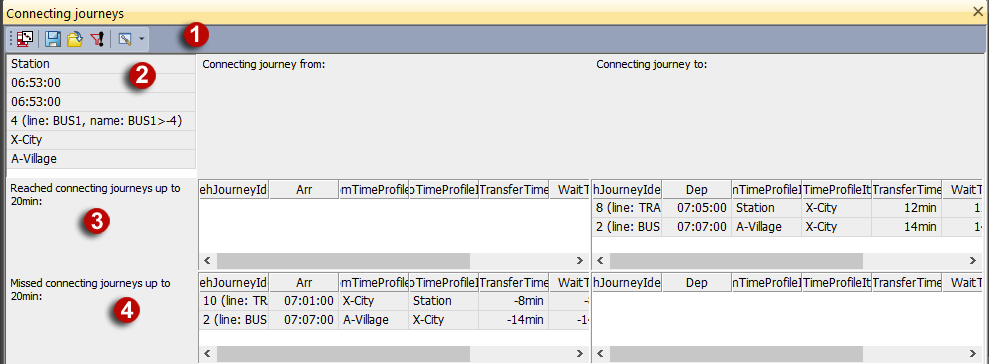
(1) Connecting journeys toolbar
You can call specific program functions via the Connecting journeys toolbar.
(2) Vehicle journey item
Attribute values of the vehicle journey item for which connecting journeys will be displayed
(3) Reached connecting journeys
Attribute values of the reached connecting journeys, separately for arriving and departing connecting journeys
(4) Missed connecting journeys
Attribute values of the missed connecting journeys, separately for arriving and departing connecting journeys
|
Element |
Description |
|---|---|
|
|
Opens the window to search for a vehicle journey item. |
|
|
Saves an existing layout file. |
|
|
Opens an existing layout file. |
|
|
If the option has been selected, only active vehicle journey items be taken into account. |
|
|
Use the little black triangle to select the section for which you want to specify attributes:
|


|
Tip: If you have activated synchronization in the Timetable (graphical) window, it is synchronized with the window Connecting journeys (Synchronizing the graphical and tabular timetables with other windows). In the graphical timetable, click a vehicle journey item to view connecting journeys in the Connecting journeys window. |
|
Notes: If the Network editor window is synchronized with other windows, the network editor shows the connecting journeys that you have marked in the Connecting journeys window. In case of a simple marking, the course of the vehicle journey of the From vehicle journey item to the predecessor of this From vehicle journey item will be displayed, including the vehicle journey section up to the transfer stop. Furthermore, the network editor shows the course of the vehicle journey of the To vehicle journey item from this item to the end of the vehicle journey, plus the relevant stop points. In case of an extended marking, the network editor also displays both entire vehicle journeys and the transfer vehicle journey items. The windows List (Vehicle journey items), Timetable (tabular) and Schematic line diagram can adopt markings from the Connecting journeys window if synchronization with other windows is activated. In this process, two vehicle journey items of each connecting journey are always marked. In the Schematic line diagram window, the two edges are marked that contain the vehicle journey items. |
|
Note: When you select a connecting journey in the Connecting journeys window, it cannot be selected in any of the synchronized windows. If you instead select vehicle journeys in another window, such as in the tabular or graphical timetable, then the vehicle journeys that are part of the connecting journeys are selected in those windows. |
