1. Make sure that the Signal timing view is selected in the Views window.
For each stage, a child window is displayed
2. Make the desired changes.
|
Note: Some of the entries of the shortcut menu correspond to the ones for signal group-based controls. They are explained in the respective section (Editing signal times of signal group-based controls). |
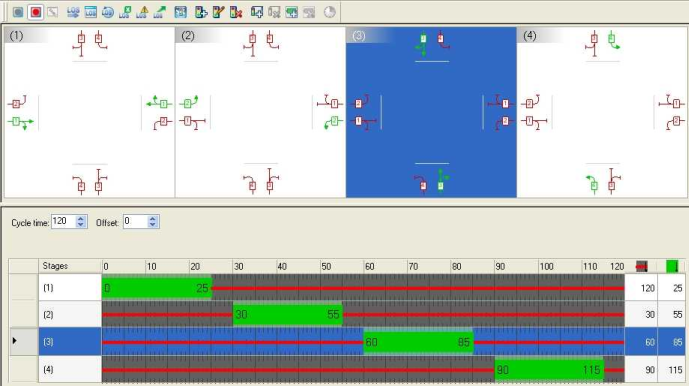
Editing the allocation of signal groups to stages
Each square in the upper section illustrates a stage. The arrows illustrate signal groups. You can regulate the allocation of signal groups to stages by clicking these arrows. All signal groups allocated to a stage, have a green light.
1. In the upper section, mark the square of the stage whose signal group allocation you want to edit.
|
Note: If you point the mouse at an arrow, the arrow and all arrows that represent the same signal group are highlighted in a different color. |
2. Edit the color of the desired arrows from red to green or from green to red by clicking the desired arrow.
The arrows change their color and the allocation to the stage.
Creating stages
You can create stages for stage-based controls for nodes.
|
Tip: Alternatively, you can use stage templates (Generating stages from templates). |
1. Make sure that the Signal timing view is selected in the Views window.
2. On the Junction editor toolbar, click the Create stage symbol  .
.
|
Tip: Alternatively, you can create further stages if you click Add stage on the shortcut menu. |
The Create stage window opens.
3. Make the desired changes.
|
Element |
Description |
|
Number |
Unique number of the stage |
|
Name |
Name of the stage |
|
Green time start |
Enter the green time start of the stage |
|
Green time end |
Enter the green time end of the stage |
|
Minimum green time |
Enter the minimum green time in seconds. Note The value takes effect during green time optimization (Optimizing signal cycles and split of a single signal controller). |
4. Confirm with OK.
The stage is inserted and displayed as a bar in the bar display.
Editing stages
You can manually edit stages in the Signal timing view by dragging the bar with the mouse to the desired width. The difference with the signal group view is that shifting green times affects all signal groups of a stage (Editing signal times of signal group-based controls).
|
Tip: Moreover, you can edit the attributes of stages in the list of the Geometry view or in the Stages list (Opening a list). |
Deleting stages
1. Make sure that the Signal timing view is selected in the Views window.
2. In the lower window of the Junction editor, right-click the bar of the stage that you want to delete.
A shortcut menu opens.
3. Select the Delete stage entry.
The stage is deleted.
|
Tip: Alternatively, you can delete a stage by clicking the |

Reading stage templates
Instead of creating stages and signal groups manually, you can use predefined stage templates (Generating stages from templates). These can be read additively in *.net format.
1. From the File menu, choose Open file > > Network.
The Open network window opens.
|
Notes: The predefined stage templates are contained in the ...\PTV Visum 2021\Data\Signal_Templates folder of your Visum installation directory. The names of the stage template files are Signaltemplateslefthandtraffic.net and Signaltemplatesrighthandtraffic.net. |
2. Select the desired file.
3. Click the Open button.
The Read network window opens.
4. Read the network additively (Reading network data additively).
The network data is read in.
|
Notes: You can edit the standard data under Network > Stage templates. You can change the names of the stage templates by double-clicking the desired row in the Templates window. |
Deleting stage templates or stage templates sets
1. On the Network menu, click Stage templates.
The Stage templates window opens. All stage templates and stage template sets existing in the network are displayed.
2. In the drop-down list, select the desired entry.
|
Tip: To select multiple entries, hold down the Ctrl key while clicking the desired entries one by one. |
3. Click the Delete button  .
.
4. Confirm with OK.
The selected entries are deleted.
Generating stages from templates
Instead of creating stages and signal groups manually, you can use predefined stage templates. Predefined stage templates ease the definition of a signal-controlled junction or main node (Fundamentals: Signalization).
1. Make sure that the Signal timing view is selected in the Views window.
2. Right-click in the lower window of the Junction editor.
A shortcut menu opens.
3. Select the Use stage template entry.
|
Note: Alternatively, you can open the window via the |

The Create stages from template window opens.
4. Make the desired changes.
|
Element |
Description |
|
Number of stages |
Specify the desired number of stages Note If, for example, you enter a 4, only stages with four stages will be displayed. |
|
Template |
Select a stage template (Reading stage templates) |
|
Reference link |
Select a reference link for the template Tip Use the |
|
Stage reference |
Use the drop-down list to specify the order of the stages. |
5. Confirm with OK.
The stages are generated based on the selected template.
