Defining static pedestrian routes
Add the first routing point as starting point for a pedestrian route (static) to the area of your choice. Define one or several pedestrian routes (static) from this routing point to other areas. Using intermediate points in areas and ramps allows you to model the course of the route realistically.
|
|
Notes:
|
|
|
Note: Start points, intermediate points or the destination of a pedestrian route must not be placed on a link defined as a pedestrian area. (Attributes of links), (Modeling links as pedestrian areas). You can specify an Area construction element on the link and then position the first routing point, intermediate point or destination of your pedestrian route in this area. |
1. On the network object sidebar, click Pedestrian Routes.
The button is highlighted. The variant of the network object type is displayed in parentheses and the button  is shown.
2. Click Pedestrian Routes again.
A list box opens.
3. Then click Static.
4. Press the Ctrl key and in the Network editor, right-click the area of your choice.
5. Release the keys.
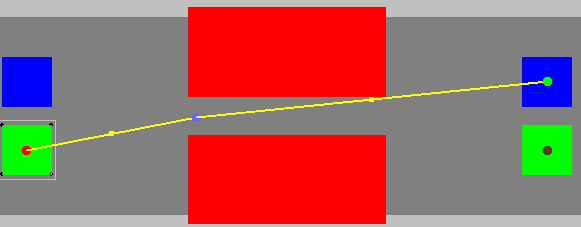
A red circle is added by default. During simulation, the pedestrians are not generated exactly at a circle, but within an area. If for this first routing point you want to insert multiple destinations, carry out the following steps accordingly. By carrying out these steps, you insert one destination.
6. Point the mouse pointer to the destination area of your choice.
The border of the destination area is highlighted.
7. Click into the destination area.
A turquoise dot is inserted by default. The pedestrian area is displayed in red. A yellow band is shown between the first routing point of the pedestrian route and the destination by default.
8. Release the keys.
The Pedestrian routing decision (static) list opens, if automatic opening of a list after object creation is selected (Right-click behavior and action after creating an object). You can add additional destinations to areas or stop the addition.

9. To insert additional destinations, point the mouse pointer to the desired area of your next destination and carry out the steps again.
When you point the mouse pointer to a destination, a yellow line will appear by default between the first routing point of the pedestrian route and the destination.
10. If you do not want to add any additional destinations, in the Network editor, click in an empty area.
Especially when defining several pedestrian routes from the first routing point of a pedestrian route, use intermediate points in areas and on ramps to model the course of a route (Modeling the course of pedestrian routes using intermediate points).
11. You can edit the attributes of a pedestrian route (Attributes of static routing decisions for pedestrian routes), (Attributes of static pedestrian routes).
The attributes are saved to the respective list.
Superordinate topic:
Modeling pedestrian routing decisions, pedestrian routes and partial pedestrian routes
Related topics:
Properties of static pedestrian routes and pedestrian routing decisions
Route choice method for partial pedestrian routes
Use cases for static partial routes of pedestrians
Attributes of static routing decisions for pedestrian routes
Attributes of static pedestrian routes


