Modeling the course of pedestrian routes using intermediate points
After you insert intermediate points, a pedestrian route, by default, has the following objects and is displayed as a line:
- a routing decision in the start area
- the destination pedestrian route location in the area where the pedestrian route ends
- The route course is shown as a yellow line.
- The yellow line contains a yellow dot in the middle.
You can insert an intermediate point of the route into each area you want the pedestrian route to traverse. You can move a pedestrian route location to a different area. Examples of use:
- You want the pedestrian route to traverse certain areas. You e.g. want to add additional destinations for the pedestrian route or partial pedestrian routes.
- You want to edit attributes that have an impact on the pedestrian route of an area, e.g. Cell size, Obstacle distance, Potential calculation method, or attributes for dynamic potential.
- You want to assign the pedestrian route location to another area or ramp
In the following cases, a route location on a ramp or stairway defines the direction that the pedestrian takes on the ramp or stairway. In these cases, the pedestrian uses the entire ramp or stairway:
- The previous pedestrian route location of the pedestrian route or the pedestrian’s routing decision must be on the same level of the ramp or stairway. This is the start or end level of the ramp or stairway.
- The previous pedestrian route location of the pedestrian route must no be part of an area for which the Waiting area for elevators attribute is selected. Near these waiting areas, the pedestrian always uses the ramp or stairway towards the start - end level.
You can edit the attributes for each pedestrian route location (intermediate point or destination) (Attributes of pedestrian route locations).
1. On the network object sidebar, click Pedestrian Routes.
2. In the Network editor, click the destination of the desired pedestrian route.
A yellow band is shown between the first routing point of the pedestrian route and the destination, including an intermediate point in the middle.
3. Click the intermediate point, hold the mouse button down, and drag the point to the ramp, stairway or area of your choice.
4. Release the mouse button.
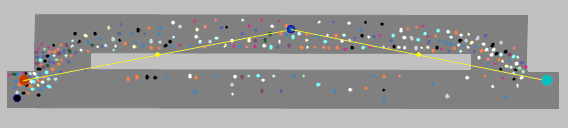
The course of the pedestrian route is adjusted. The intermediate point is larger and displayed as a blue circle by default (in the figure in the middle of the upper area). Additional yellow points are displayed (in the figure on the left and right lower margin of the upper area). Using these points, you can model the pedestrian routes in more detail.
|
|
Note: Within a pedestrian area, there must not be two adjacent intermediate points of a static pedestrian route or a partial pedestrian route. |

Superordinate topic:
Modeling pedestrian routing decisions, pedestrian routes and partial pedestrian routes
Related topics:
Properties of static pedestrian routes and pedestrian routing decisions
Route choice method for partial pedestrian routes
Use cases for static partial routes of pedestrians
Attributes of static routing decisions for pedestrian routes
Attributes of static pedestrian routes
