The upgrading procedure requires the stopping and starting of Optima services. For information on checking, stopping, and starting Optima services: → Managing Optima services.
Within the procedure, there are some differences depending on your installation scenario. Make sure you follow the instructions that match your scenario (→ Installation scenarios).
Important: During the update, Optima must be stopped and restarted. It is a good practice to notify in advance all persons who might be affected by the upgrade process.
On all Optima servers, stop all Optima services (Windows server in case of Single Server scenario, one Windows server plus two Linux servers in case of a Three Servers scenario).
For information on which services you need to stop on which server, and for information on how to stop Optima services, please see → Managing Optima services.
Create a backup copy of all Optima components that must be upgraded.
On the .NET server (Single Server scenario):
- Open pgAdmin 4.
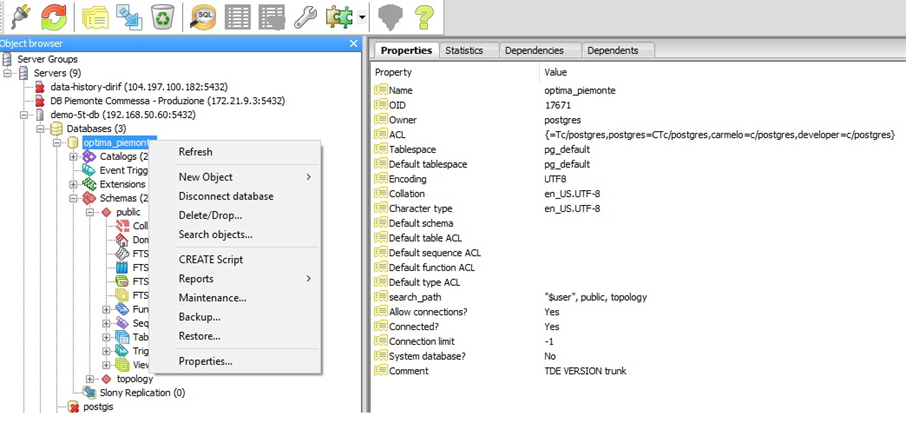
- Connect to PTV Optima DB Server Groups > Servers > PostgreSQL 17 > Databases > optima. Use postgres for both username and password.
- Right-click the database name.
-
On the shortcut menu, click Backup.

On the Optima AS (Single Server scenario):
-
Move the folder
/optima_install/ptv-optima-as/
to the folder
/optima_install/optima_old/XX.X.XXXXX/ptv-optima-as/Typically the folder optima_old has been already created when installing optima. Otherwise, create it now.
Replace XX.X.XXXXX with the version number of Optima you currently have installed. If you do not know the version number, you can retrieve it from the file: ptv-optima-version.txt
On the .NET server (Single Server scenario):
- Move the folder
C:\optima\
to the folder
C:\optima_old\XX.X.XXXX\, replacing XX.X.XXXX with the version number of Optima you currently have installed. If you do not know the version number, you can retrieve it from the file ptv-optima-version.txt.
- Extract the contents of the installation archive (ZIP file) that contains the new Optima version XX.X.XXXXX to be installed in the folder C:\optima\optima_zip\PTV-Optima-XX.X.XXXXX\.
- Remove the folder that corresponds to the old installation from C:\optima\optima_zip\ to save space (optional).
Compatibility between the software and the data model can only be ensured within the same Optima version. Therefore, you need to migrate the DB structure from the previous Optima version to the DB structure of the Optima version to be installed.
Important: This MUST be done before installing the new software version.
You can perform the migration with the help of special scripts, which are included in the installation archive containing the new version.
On the .NET server (Single Server scenario):
- Extract the folder
TDE-XX.X.XXXXX.zip
and copy it to
C:\optima\ -
Rename the folder to TDE (no version number).
So the folder now is: C:\optima\TDE\.
-
Navigate to the folder C:\optima\TDE\database_definition\migration_scripts\.
This is the folder that contains the DB migration scripts. A single script only migrates from one version to the version that immediately follows this version.
Important: In case you have skipped some Optima versions, you need to run multiple DB migration scripts one after the other.
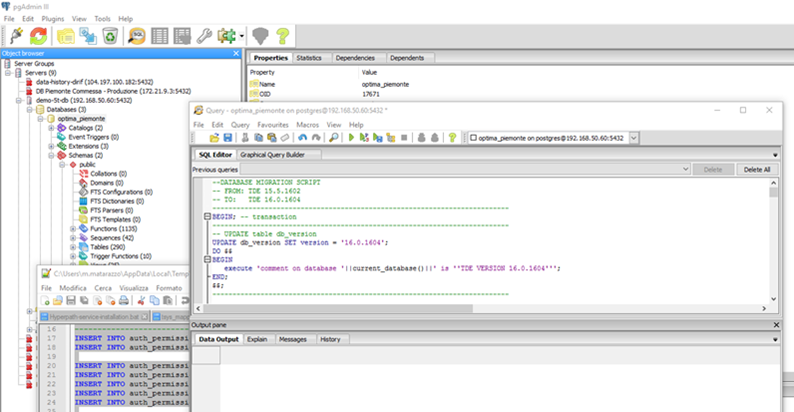
- In pgAdmin 4, connect to the Optima DB. (Select Server Groups > Servers > PostgreSQL 17 > Databases > optima. Use postgres for both username and password.)
- Press Ctrl+E to open the Query Manager.
- Run the query select * from DB_version.
- On the File menu, click Open.
- Select the script that fits your version as reported in step 6.
- Confirm with OK.
-
Click the Play button.

- Repeat steps 6 through 1 for each migration script that you need to run.
Configuration merging needs to be done by an expert. We assume that your PTV project manager has given you some updated configuration files.
-
Move the folder
C:\optima\optima_zip\PTV-Optima-XX.X.XXXXX\ptv-optima-as\
into the folder
C:\optima\So it now is: C:\optima\ptv-optima-as\
- In a text editor, open the configuration file:
\ptv-optima-as\bin\standalone.conf.bat -
Search the parameter -Xmx and set the maximum amount of RAM available for the Optima application server.
Example: -Xmx4G allows the Optima AS to use up to 4 GB of RAM.
Typical configurations depend on the amount of RAM available on the machine and on your specific Optima installation. Assuming that the server is only used for Optima:
- If only the Optima AS is running on the machine, set the value to 80% of the RAM available. This is typically not the case for the scenario where Optima is installed on a single server. You must at least have the PostgreSQL DB server running on the same machine.
- If both the optima AS and the DB server are running on the machine, set the value to 60% of the RAM available.
- If the installation includes one or more .NET components, such as TRE, VMS, etc., set the value to 50% of the RAM available.
- With a text editor, open the file:
C:\optima\ptv-optima-as\standalone\configuration/standalone.xml -
Search for the node <datasources> and find the row <datasource> that contains enable=TRUE.
Add the database parameters to the subnode <connection-url>.
<connection-url>
jdbc:postgresql_postGIS://localhost:5432/optima
</connection-url>Should you have set a different port for the database when you installed PostgreSQL, change the port number 5432 according to the port number you have used.
- Search for the node <security>.
-
Make sure that both <username> and <password> have been set to postgres:
<security>
<user-name>postgres</user-name>
<password>postgres</password>
</security> - Save the file standalone.xml.
- With a text editor, open the file:
C:\optima\ptv-optima-as\standalone\configuration\optima\optima-configuration.xml - Search for the node <appSettings>.
-
In the subnode <TSTimezone>, set the time zone of the network. For information on time zones: https://en.wikipedia.org/wiki/List_of_tz_database_time_zones.
Example:
<TSTimezone>Europe/Rome</TSTimezone> - Save the file optima-configuration.xml.
On the Optima AS:
- Extract the contents of the installation archive (ZIP file) that contains the new Optima version XX.X.XXXXX to be installed in the folder: /opt/optima/optima_zip/PTV-Optima-XX.X.XXXXX/
- Remove the folder that corresponds to the old installation from /opt/optima/optima_zip\ to save space (optional).
-
Copy the folder
ptv-optima-as
into the folder
/opt/optima/configuration/Caution: Merging needs to be performed by an expert. Therefore, compare the old and new application server settings if needed.
-
Change the owner of the application server folder of the new version to the user ptv-optima-as. This user has already been created the first time the Optima application server was started.
- To open a bash shell, press Ctrl+Alt+T .
- To log in with administrator rights, execute:
su
When prompted, enter the root password. - To navigate to the Optima application server installation folder, execute:
cd /opt/optima/ - To set up the correct username and group for the folder, execute:
chown -R ptv-optima-as:ptv-optima-as ptv-optima-as - To navigate to the folder that contains the application server scripts, execute:
cd ptv-optima-as/bin - To make the scripts executable, execute
chmod +x *.sh
- If neither the resources available have been changed nor are you going to install other components, you can assume that the Java settings used in the installation of the previous version are still valid. Otherwise, configure the performance of the Optima AS (as described in → Installing Optima on three servers > Installing the Application Server (AS) on a Linux server).
-
Configure the datasource for the Optima AS.
- With a text editor, open the file:
\opt\optima\ptv-optima-as\standalone\configuration\standalone.xml -
Search for the node <datasources> and find the row <datasource> that contains enable=TRUE.
Add the database parameters to the subnode <connection-url>:
<connection-url>
jdbc:postgresql_postGIS://DB_SERVER_IP:5432/optima
</connection-url>Replace DB_SERVER_IP with the IP address of the DB server on which PostgreSQL is installed. Should you have set a different port for the DB when you installed PostgreSQL, change the port number 5432 according to the port number you have used.
- Search for the node <security>.
-
Make sure that both <username> and <password> have been set to postgres:
<security>
<user-name>postgres</user-name>
<password>postgres</password>
</security> - Save the file standalone.xml.
- With a text editor, open the file:
\opt\optima\ptv-optima-as\standalone\configuration\optima\optima-configuration.xml - Search for the node <appSettings>.
-
In the subnode <TSTimezone>, set the time zone of the network. For information on time zones: https://en.wikipedia.org/wiki/List_of_tz_database_time_zones
Example:
<TSTimezone>Europe/Rome</TSTimezone> - Save the file: optima-configuration.xml
- With a text editor, open the file:
On the .NET server (Single Server scenario)
- Unzip the folders that correspond to the .NET components that you need to upgrade.
- Copy the unzipped folders to the folder: C:\optima\
- Rename the folders, removing the version number. Example: TRE-XX.X.XXXXX becomes TRE).
-
You do not need to reinstall the .NET framework. It is already present on the machine from the initial Optima installation.
However, you need to reinstall the components:
- For Single Server scenario: → Installing Optima on a Windows server > Installing .NET components.
- For Three Servers scenario: → Installing Optima on three servers > Installing .NET components (optional).
The Optima database is started automatically after installation.
The Optima application server and the available .NET components need to be restarted manually.
Step 1: Restarting the Optima application server
- Open Windows Services.
- Find the service: ptv-optima-as
- Click Start to start the service.
- To verify whether the Optima application server has started up successfully, search the log file
C:\optima\ptv-optima-as\standalone\log\server.log
for the row
WildFly … started …
Along with the Optima AS, a number of other services should also start automatically, depending on which services are included in your Optima license. These services are:
- ts (Traffic Supervisor) with webcheck: 127.0.0.1:8080/ts <administrator user-name>:<administrator password>
- optima-wsi (Optima Web Server Interface)
- OptimaControl
- harmonizer
- geoserver
- dbworker
- datex2import
You can see whether these services have been correctly deployed in the folder: /optima/ptv-optima-as/standalone/deployments/
Step 2: Restarting the .NET components.
- Open the Windows Control Panel.
- Open Administrative tools > Services.
- Find the service of the component that you want to restart.
- Click Start.
- To verify that the service of the component has been restarted successfully, inspect the log file associated in the table in: → Managing Optima services.
The Optima DB is started automatically after the installation.
The Optima AS and the available .NET components need to be restarted manually.
Step 1: Restarting the Optima AS.
- On the Optima AS, press Ctrl+Alt+T to open a bash shell.
- To log in with administrator rights, execute:
su
When prompted, enter the root password. - To copy the file ptv-optima-as.sh into the folder /etc/init.d, execute:
cp /opt/optima/ptv-optima-as/bin/init.d/ptv-optima-as.sh /etc/init.d/ptv-optima-as -
To make the startup script executable, execute:
chmod +x /etc/init.d/ptv-optima-as - To navigate to the service folder, execute:
cd /etc/init.d - To set up the script to start automatically at startup, execute:
update-rc.d ptv-optima-as defaults -
To start the Optima application server, execute:
service ptv-optima-as start
Along with the Optima AS, a number of other services should also start automatically, depending on which services are included in your Optima license. These services are:
- ts (Traffic Supervisor) with webcheck: 127.0.0.1:8080/ts <administrator user-name>:<administrator password>
- optima-wsi (Optima Web Server Interface)
- OptimaControl
- harmonizer
- geoserver
- dbworker
- datex2import
On the .NET server:
Step 2: Restarting the .NET components.
- Open the Windows Control Panel.
- Open Administrative tools > Services.
- Find the service of the component that you want to restart.
- Click Start.
- To verify that the service of the component has been restarted successfully, inspect the log file associated in the table in: → Managing Optima services.