You can install Optima on Linux (Oracle Linux 8) server.
On this server you can install the main components:
- The .NET components (.NET server)
- The Optima database (DB server)
- The Optima application server (Optima AS)
| Operating system | Installed element | Third-party software |
|---|---|---|
| Oracle Linux 8 | Optima DB | PostgreSQL ver. 17.4 |
| PostGIS ver. 3.5.2 | ||
| Optima .NET components | .NET Core 3.1 64 bit | |
| Optima AS | Java 11 |
For information about other installation options:
Important: Before you begin, make sure that you have prepared the installation properly (→ Optima installation procedures).
Optima provides a TRE version compiled for .NET capable to run on a Linux server.
The installation package is Optima-vv.n.xxxxx.zip.
- Copy Optima-vv.n.xxxxx.zip on /opt/optima_zip
- Uncompress the Optima-vv.n.xxxxx.zip.
-
In the uncompressed folder you can find a sub-set of .NET components, for example:
- /opt/optima_zip/TRE-netcore.zip.
- /opt/optima_zip/TRE-planning-netcore.zip.
- /opt/optima_zip/TDE-netcore.zip.
- Extract the archive in: /opt/optima_zip/TRE-netcore.zip.
-
Find the file
/opt/optima_zip/TRE-netcore/installation_script/ptv-optima-tre-netcore-install.sh -
Run the script ptv-optima-tre-netcore-install.sh:
sh ptv-optima-tre-netcore-install.shThe script installs all necessary components and the TRE service.
The installation folder of the service is:
/opt/ptv-optima-tre.
The folder now stores the log file associated to the service.
-
Copy the file
ptv-optima-vv.n.xxxxx/TRE-netcore-planning-vv.n.xxxxx.zip
to:
/opt/optima_zip - Extract the archive in: /opt/optima_zip/TRE-netcore-planning-vv.n.xxxxx.
-
Copy the file
TRE-netcore-planning-vv.n.xxxxx/TRE-planning-netcore/installation_script/ptv-optima-tre-netcore-install.sh
to:
/opt/optima_zip -
Run the script ptv-optima-tre-netcore-install.sh:
sh ptv-optima-tre-netcore-install.shThe script installs all necessary components and the TRE-planning service.
The installation folder of the service is:
/home/ptv-optima-tre/TRE-planning-netcore.
The folder now stores the log file associated to the service.
-
For the service TRE:
-
Check the service by running the command:
systemctl status ptv-optima-tre.service.
-
Start the service by running the command:
systemctl start ptv-optima-tre.service.
-
Stop the service by running the command:
systemctl stop ptv-optima-tre.service.
-
-
For the service TRE-planning:
-
Check the service byrunning the command:
systemctl status ptv-optima-tre-planning.service.
-
Start the service by running the command:
systemctl start ptv-optima-tre-planning.service.
-
Stop the service by running the command:
systemctl stop ptv-optima-tre-planning.service.
-
On the server, set the correct time and time zone.
Important: You need root privileges to run the script.
- On the DB server, press Ctrl+Alt+T to open a bash shell.
-
Execute:
sudo -sThen insert the user password or use su - root and the root password. This logs you in with super-user privileges.
-
Execute:
yum install unzip - Execute:
unzip /opt/optima_zip/ptv-optima-zip-vv.n.xxxxx.zip - Execute:
cd /opt/optima_zip/ptv-optima-vv.n.xxxxx/optima_install/Linux/postgresql - Execute the script:
./sh installPostgresql-ONLINE.sh
On the DB server:
-
Execute:
cd /opt/optima_zip/ptv-optima-vv.n.xxxxx/optima_install/Linux
- Execute:
sh Configure-HugePages.sh –h hugepages -r 0.7
Tip: In step 2, we have chosen 70% of the total memory. For details on DB performance configuration: → Performance (support issues).
To check whether the current locale has been set:
- On the DB server, run the command perl -e exit.
-
If the command fails with a warning message similar to the image, the current locale has not been set.
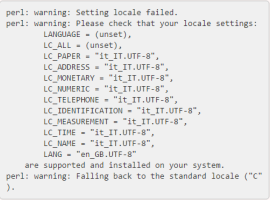
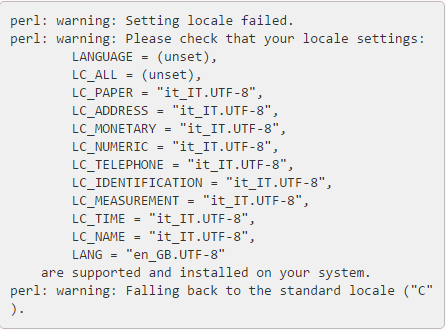
Important: If the current locale has not been set, you need to install the missing locale (it_IT.UTF-8 in the example) when prompted during the DB setup procedure. The additional locale must not be set as default but must be generated as indicated in Step 4.
-
Run the command for your relevant continent and location:
timedatectl set-timezone zoneFor example:
timedatectl set-timezone Europe/Rome -
Check whether the timezone has been changed correctly by running the command:
timedatectl
-
On a server with .NET software (v8) installed, open the folder:
cd /opt/optima_zip/
-
Copy the file
Optima-vv.n.xxxxx.zip
to:
opt/optima_zip/ -
Extract the archive in: opt/optima_zip/Optima-vv.n.xxxxx
You get a list of zipped files
-
Extract the archive ptv-optima-db.zip
You now see the folder ptv-optima-db
- Change the directory:
cd /opt/optima_zip/ptv-optima-db/creation_scripts
- Run the script:
bash create-empty-db.sh
The script asks you to set three parameters:
DB NAME (Default value: optima)
DB USER (Default value: postgres)
DB HOST (Default value: 127.0.0.1 (local host))
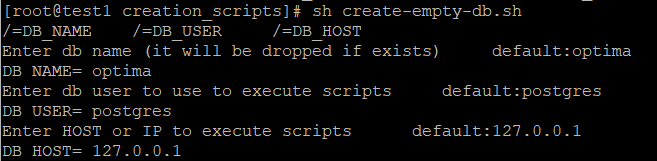
Tip: You can confirm default values or you can set your own specific values.
The outcome is the creation of the empty Optima DB schema.
-
Verify the success of the previous step:
- Open pgAdmin 4.
- Connect to the DB_SERVER_IP address, using the default username and password (→ Installation conventions to follow).
- Make sure that there are over 200 tables under Server Groups > Servers > PostgreSQL 17 > Databases > optima > schema > public > tables.
To load the model into the empty database, you can use the Transportation Data Exchange component (TDE).
- On the .NET server, check whether custom scripts are available ([…]/optima_zip/PTV-Optima-vv.n.xxxxx/Custom_SQL).
-
Use the pgAdmin tool to execute the SQL custom scripts as provided in the folder (e.g. 00-Before_TDE.sql or the script 00-PreFill.sql. Ensure whether it is necessary to run some scripts before (AND after) deploying the model in the database).
-
Extract the archive
[…]/PTV-Optima-vv.n.xxxxx/TDE-vv.n.xxxxxx.zip
to:
opt/ptv-optima-TDE - Copy all network model files (.net, .dmd, .xml, and tprb.sql for both the simulation model and for the current model) from
[…]/optima_zip/PTV-Optima-vv.n.xxxxx/Visum_Model/
to:
opt/ptv-optima-TDE/model_update/ -
If your PTV project manager has given you a TDE configuration file CommandLineTDE.csv, copy this file to: opt/ptv-optima-TDE/
If you have not been given this configuration file:
-
Copy the file opt/ptv-optima-TDE/config-templates/CommandLineTDE.csv
to: opt/ptv-optima-TDE
-
Open the copy of CommandLineTDE.csv with a text editor.
For a detailed description of TDE configuration: → Transportation Data Exchange (TDE).
Important: Each variable value is given directly below the variable name. All subsequent rows up to the next variable name are ignored. A value of −1 forces TDE to get the value from the DS_MAIN datasource. A value of −2 forces TDE to ignore a specific variable in the configuration file. This makes it possible to skip the import of specific parts of the model.
- Configure the main datasource DS_MAIN to connect to the simulation model. For Visum export files named <simmod_filename>.net, .xml, .dmd, insert visum:/.../model_update/<simmod_filename> with no extension.
-
Configure the output datasource DS_OPUT to connect to the database where the result will be stored:
postgresql:Server=DB_SERVER_IP;Port=5432;Uid=postgres;
Pwd=postgres;Database=optima;CommandTimeout=3600Replace DB_SERVER_IP with the IP address of the DB server hosting PostgreSQL ver. 17.4.
-
-
Create a database backup.
Caution: Do not skip this step! The DB backup is necessary to restore it in case of unexpected fails.
- Open pgAdmin 4.
- Click Server Groups > Servers > PostgreSQL 17 > Databases > optima to connect to the DB that you have created in the previous steps.
- Right-click and choose Backup.
- Choose the backup folder, for example: opt/ptv-optima-DB.xxx.
-
Double-click the executable file: C:\optima\TDE\TDE_GUI.exe
A dialog box opens. It shows the configuration review panel to run the TDE software.
-
Click Execute.
The operation can take some time, depending on the size of the model.
-
If the folder model contains additional scripts, such as .sql or .backup, restore them with pgAdmin 4.
For .sql files:
- Open pgAdmin 4.
- Press Ctrl+E to open the Query Manager.
- On the File menu, click Open to execute the .sql.
For .backup files:
- Open pgAdmin 4.
- Browse to the Optima DB.
- Right-click the DB or a specific table.
- Right-click and choose Restore.
- On the Restore Options#1 tab, set the parameter Type of object to only data.
The DB hosts now the network model.
On the .NET server:
-
Open the TDE log file:
C:\optima\TDE\LogFile_TDE_GUI.log
Important: It is MANDATORY to check for the absence of ERROR messages in the log file.
- Open pgAdmin 4.
-
Click Ctrl+E to open the Query Manager.
-
Execute the following queries to verify basic database integrity (click F5 to execute a query):
- SELECT COUNT(*) from link must return the number of assignment links of the model (greater than zero).
- SELECT COUNT(*) from strt must match the number of links in the Navteq network (greater than zero).
- SELECT COUNT(*) from lkst must be greater than zero.
If all the checks listed have been successful, you get a valid DB.
- On the Optima AS, copy the folder
/opt/optima_zip/ptv-optima-vv.n.xxxxx/ptv-optima-as/
to
/opt/ptv-optima-as - With a text editor, open the configuration file:
/opt/ptv-optima-as/bin/standalone.conf -
Make sure that the following parameters have been set as recommended in the table below. The minimum setup requires the setting for -Xmx.
Java parameter Definition Values to use -Xms Minimum RAM -Xms3G Change according to the model size.
-Xmx Maximum RAM usage -Xmx4G Example: -Xmx4G allows the Optima application server to use up to 4 GB of RAM.
Change according to the model size.
Typical configurations depend on the amount of RAM available on the machine and on the specific Optima installation. Usually 80% of the RAM available is a correct value.
-XX:+UseG1GC -XX:+UseG1GC Important: Enabled by default in Java 11.
-XX: -UseAdaptiveSizePolicy Important: Enabled by default in Java 11.
-XX:SurvivorRatio=1 -XX:+UseLargePages To calculate the parameters for Large Memory Pages see here.
-
Change the folder:
cd /opt/optima_zip/optima_install/Linux/java - Execute:
sh Configure-HugePages.sh –g hugepages -r 0.7
Important: You need to perform this task ONLY if you need to run TS (→ Traffic Operator’s Guide TS).
- On the Optima AS, with a text editor open the file:
/opt/ptv-optima-as/standalone/configuration/standalone.xml -
Search for the node <datasources> and find the row <datasource> that contains enable=TRUE.
Add the database parameters to the subnode <connection-url>. If you have followed the previous instructions, this is:
<connection-url>
jdbc:postgresql_postGIS://DB_SERVER_IP:5432/optima
</connection-url>Replace DB_SERVER_IP with the IP address of the database server on which PostgreSQL has been installed. Should you have set a different port for the database when you installed PostgreSQL, change the port number 5432 according to the port number that you have used.
- Search for the node <security>.
-
Make sure that both <username> and <password> have been set to postgres:
<security>
<user-name>postgres</user-name>
<password>postgres</password>
</security> - Save the file standalone.xml.
-
If the Traffic Supervisor module is deployed, you need to configure the correct time zone.
In the file /opt/ptv-optima-as/standalone/configuration/optima/optima-configuration.xml, find the node <TSTimezone> (→ <TSTimezone> tag) where you can set the time zone of the network and model.
For information on time zones, see https://en.wikipedia.org/wiki/List_of_tz_database_time_zones.
Example:
<TSTimezone>Europe/Rome</TSTimezone>
In the subnode <TSTimezone>, set the time zone of the network and model. For information on time zones, see: https://en.wikipedia.org/wiki/List_of_tz_database_time_zones
Example:
<TSTimezone>Europe/Rome</TSTimezone> -
Save the file /opt/ptv-optima-as/standalone/configuration/optima/optima-configuration.xml
The AS can be configured to send log errors via e-mail.
The feature can be useful for different goals.
For examples, TomTom and INRIX interfaces can notify the map version changes.
Setting SMTP alerts
In a Windows environment, update the file:
C:\optima\ptv-optima-as\standalone\configuration\standalone.xml
In a Linux environment, update the file:
/opt/ptv-optima-as/standalone/configuration/standalone.xml
The information to be updated is:
- Handler (<custom-handler name="emailHandler"/>).
- E-mail address of the sender ("From").
- E-mail address of the receiver ("To").
- Host name of the SMTP server to send the e-mail ("SMTPHost").
- Port number of the SMTP server to send the e-mail ("SMTPPort").
Example:
<custom-handler name="emailHandler" class="org.apache.log4j.net.SMTPAppender" module="org.apache.log4j">
    <level name="ERROR"/>
    <formatter>
        <pattern-formatter pattern="%d{HH:mm:ss,SSS} %-5p [%c] (%t) %s%E%n"/>
    </formatter>
    <properties>
        <property name="BufferSize" value="1"/>
        <property name="From" value="name.surname@ptvgroup.com"/>
        <property name="To" value="name.surname@ptvgroup.com"/>
        <property name="Subject" value="Optima Warning"/>
        <property name="SMTPHost" value="${env.MAIL_SMTP_SOCKET_HOST:localhost}"/>
        <property name="SMTPPort" value="${env.MAIL_SMTP_SOCKET_PORT:25}"/>
     </properties>
</custom-handler>
The Optima DB is started automatically after installation.
The Optima AS and the available .NET components need to be started manually.
- On the Optima AS, press Ctrl+Alt+T to open a bash shell.
-
To log in with administrator rights, execute:
suWhen prompted, enter the root password.
-
Change folder:
cd /opt/optima_zip/optima_install/Linux/java
-
Execute:
sh as-configure.sh
- To start the Optima application server, execute:
service ptv-optima-as start -
To start a Linux service, run:
systemctl start ptv-optima-servicename
where servicename can be:
-
tre
-
hyperpath
-
planning
-
as
-
vt
-
vms
-
other service
-
Along with the Optima AS, a number of other services should also start automatically, depending on which services are included in your Optima license. These services are:
- ts (Traffic Supervisor) with webcheck: 127.0.0.1:8080/ts <administrator user-name>:<administrator password>
- optima-wsi (Optima Web Server Interface)
- OptimaControl
- harmonizer
- geoserver
- dbworker
- datex2import
You can see whether these services have been correctly deployed in the folder: /opt/ptv-optima-as/standalone/deployments/
- On the .NET server, run the service of the .NET component that you want to start.
- Open and check the corresponding log file to verify whether the procedure has been successful.