You can save the attributes of a list to a newly created or an existing database.
|
Notes: For lists of the types PuT path legs and PrT paths on link level, select an appropriate export format prior to data export (Formatting the path list for database export). You can save grouped lists but they cannot be read in again. |
1. On the toolbar, click the  button Save list to database.
A query opens.
2. Select the desired database format.
3. Confirm with OK.
Another window opens. Further proceedings depend on the format which you have chosen.
Exporting attributes to an SQLite database
1. Select SQLite.
2. Confirm with OK.
The Save SQLite database window opens.
3. Enter the file name and the path, if required.
4. Click the Save button.
The Save attributes to database window opens.
5. Select the Use aliases option, if required.
|
Note: If this option is selected, your aliases are saved in the attribute file instead of the conventional attribute names (Specifying an alias for attribute names). |
6. Confirm with OK.
The list content is exported to the SQLite database.
Exporting attributes to an access database
1. Select the option MS Access 2003 or earlier or MS Access 2007 or up.
The Save Access 2007 database window opens.
2. Enter the file name and the path, if required.
3. Click the Save button.
The Save attributes to database (<network object type>) window opens.
4. Make the desired changes (Saving a list as an attribute file).
5. Confirm with OK.
The list content is saved to the database, where it can be edited.
Exporting attributes to an SQL database
1. Select the MS SQL server option.
The Data link properties window opens.
2. Make sure that the Provider tab is selected.
3. In the list, select a suitable provider, for example Microsoft OLE DB Provider for SQL Server.
4. Click Next.
The Connection tab is displayed.
5. Enter a Server name or select a name in the list.
6. Under User name, enter a name for the access to the SQL server.
7. Under User name, enter a password for the access to the SQL server.
8. Select the Allow saving of password option.
9. Under topic 3, select a database from the list.
10. If required, check the connection to the server by clicking the Check connection button.
11. Confirm with OK.
The Save attributes to database (<network object type>) window opens.
12. Make the desired changes (Saving a list as an attribute file).
13. Confirm with OK.
The list content is saved to the database, where it can be edited.
Formatting the path list for database export
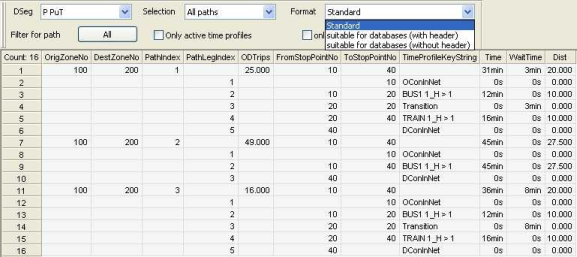
You can export the PuT path leg list or the PrT paths on link level list to a database if you specify the following settings.
1. Open the desired list (Opening a list).
The list is displayed.

2. Under Format, select a display suitable for databases.
|
Element |
Description |
|
Default |
A header displays the basic information on the respective path. Below, the sections of the path are listed in which the key columns Origin zone number, Destination zone number, and Path Index are not allocated. Note This view offers the best overview. However, the list cannot be exported to a database in this view as the key columns are not filled in each row. |
|
Suitable for databases (with header) |
Both in the header as in the rows of the individual sections, all key data is put first. The data can be exported to a database. Note The Index (PrT) and the Path leg index (PuT) columns display a zero in the header of the respective path. |
|
Suitable for databases (without header) |
This view does not display a header. All key data is put first in each row. The data can be exported to a database. |
|
Tip: Alternatively, you can specify this setting under List (PuT path legs) > Format. |
The list is displayed in the selected format.
|
Note: The setting of the Format option is saved with the list layout file (Saving a list layout). |

