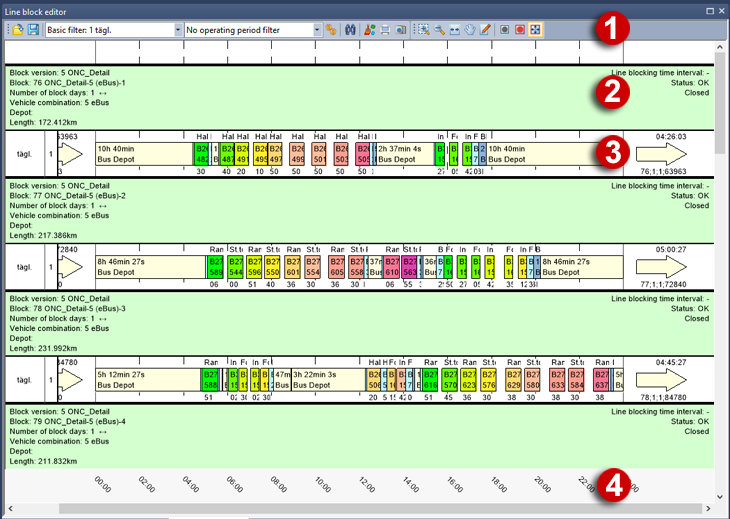
Line blocks can be displayed and edited in a block view.
1. From the View menu, choose Line block editor.
The Line block editor window and Line block selection open.
2. If necessary, select a different valid day Basic filter in the drop-down list of the toolbar of the line block editor.
3. In the navigator of the Line block selection window, select the block versions, vehicle combinations and blocks which you want to display in the line block editor.
|
Note: Here, you can display the subordinated objects of an entry by clicking the respective plus icon. |
The selected line blocks appear in the line block editor window.
|
Tips: In the Line block editor window, you can change the display similar as to in the Network editor window (Network editor window). You can enlarge, reduce, or shift the window section via symbols in the toolbar, for example. You can hide or show the margins of the block view by selecting the Upper margin visible, Lower margin visible, Left margin visible, Right margin visible entries on the shortcut menu. |
The Line block editor window

(1) Line block editor toolbar
Using the Line block editor toolbar, you can call specific program functions.
(2) Header data block version
You can display information on the block version in this line. You can set the attributes in the graphic parameters of the line block editor (Setting the graphic parameters of the Line block editor)
(3) Block display of block days
The line block items of a block day, for example vehicle journeys, preparation times or empty trips, are displayed as colored rectangles. You can also display items like chained up vehicle journey sections. The display of the items can be set in the graphic parameters (Setting the graphic parameters of the Line block editor).
(4) Time axis
The time axis of the block version. You can scale the axis with the mouse wheel.

