1. From the File menu, choose Export graphics (<name of selected view>) > Export SVG.
The SVG export: <Name of the selected view> window opens.
|
Note: The window contains a button which is labeled either with Expand or Reduce. If you click the Expand button, more export options are displayed in the window. If you click the Reduce button, the window is reduced. |
2. Make the desired changes.
|
Element |
|
|
Optimized for |
With this option you specify whether the exported file shall be adjusted for a display in a browser, as Visum background, or for further editing in Adobe Illustrator (Notes on Visum SVG files in Adobe Illustrator) or Inkscape. Browser If the option has been selected, the exported file is optimized for a display in a browser. PTV Vision (background) If the option has been selected, the exported file is optimized for a display as Visum background. Inkscape If the option has been selected, the exported file is optimized for Ink-scape. Adobe Illustrator If the option has been selected, the exported file is optimized for Adobe Illustrator. Note If the SVG export is optimized for further editing in Adobe Illustrator or Inkscape, the graphics is transformed to an output page. The settings for the output page are specified in a separate window that opens automatically if you confirm with OK. |
| Display area |
Select whether you want to save the current pane of the network window or the print area as a graphic. Current pane If this option is not selected, the current display area will not be saved. Print area If the option is selected, the specified print area is saved (Specifying the print area). Specify the desired Image width in the selected unit. |
|
General options |
Embed SVG file in HTML
Note This option is only relevant for browser display. Tip An *.svg file embedded in Html has the advantage that the Html page contains a control of all levels which can be used to switch the respective levels on or off in the browser. Create clipping rectangle If selected, this option defines a rectangular area where all graphical objects are inserted. This area is the current screen window. All objects that exceed the rectangle are cut off. No line width scaling
Note Most browsers do not interpret the SVG characteristics correctly which is used when selecting the option. Opera from version 9 is an exception. We thus recommend choosing this option only when using the exported SVG file as Visum background. Co-ordinate system You have the following options for the co-ordinate transformation. Adjust automatically If the option is selected, the co-ordinate system of the SVG file is automatically adjusted and independent of the original network co-ordinates. This ensures that the co-ordinates are in an optimal range, so that the display in SVG viewers is optimized and not too many decimal places are needed. Use original coordinates If this option is selected, the original network co-ordinates are exported. Since the Y-axis in SVG is inverted as opposed to Visum, a transformation in SVG is applied for this purpose. If the co-ordinates are too large or there are too many decimal places, this option may cause rounding inaccuracies in some SVG viewers. Use negative Y coordinates If this option is selected, the original coordinates are exported. To compensate for the different orientation of the Y-axes, the Y-coordinates are negated and no transformation is used in SVG. If the co-ordinates are too large or there are too many decimal places, this option may cause rounding inaccuracies in some SVG viewers. |
|
Connections |
Use absolute paths
Note We recommend using relative paths. Copy images to SVG folder
|
|
JavaScript |
Create Onclick Event Handler If the option has been selected, a Javascript Event Handler is generated. Note If you display the SVG file in a browser and activate JavaScript for your browser, you can access the objects in the *.svg file interactively by clicking individual objects when selecting the option. A separate window then displays information (key attributes) on the objects and the layers containing objects. You can add further user-defined functions, for example COM commands, to the JavaScript file. Swap function to file
Notes The option is only available if the Create Onclick Event Handler option has been selected. An external file is useful if you want to modify the script and have to call this function from several different SVG files. |
 If the option has been selected, an
  If the option has not been selected, only an
 3. Confirm with OK.
If you have selected the option Optimized for: Browser, the network display is exported directly. If you have selected the option Optimized for: Adobe Illustrator, the Set up the output page for SVG export window opens.
4. Make the desired changes for the size of the graphic for output.
|
Element |
Description |
|
Preview |
Preview of the output page with the current settings |
|
Parameters |
Use the drop-down list to select a predefined page size (e.g. DINA4 or DINA3). Width Here you can adjust the width of the output page manually. Height Here you can adjust the height of the output page manually. Margin Here you can adjust the width of the margin. In another drop-down list, you can select the desired length unit. Portrait / Landscape Here you can select the desired page format. |
5. Confirm with OK.
The Save: SVG file window opens.
6. Enter the file name and the path, if required.
7. Click the Save button.
The network display is exported as *.svg graphics file.
|
Notes: All fonts installed on the system can be exported in *.svg format. We recommend using standard fonts, for example Arial or Times New Roman, for text and labeling, since the display of some fonts in the SVG Viewer is not compatible with the Visum screen display. SVG files can only display raster graphics in the formats *.jpg, *.gif and *.png. If raster graphics in other formats are integrated in the version, a copy in format *.png is generated and integrated into the SVG graphics. |
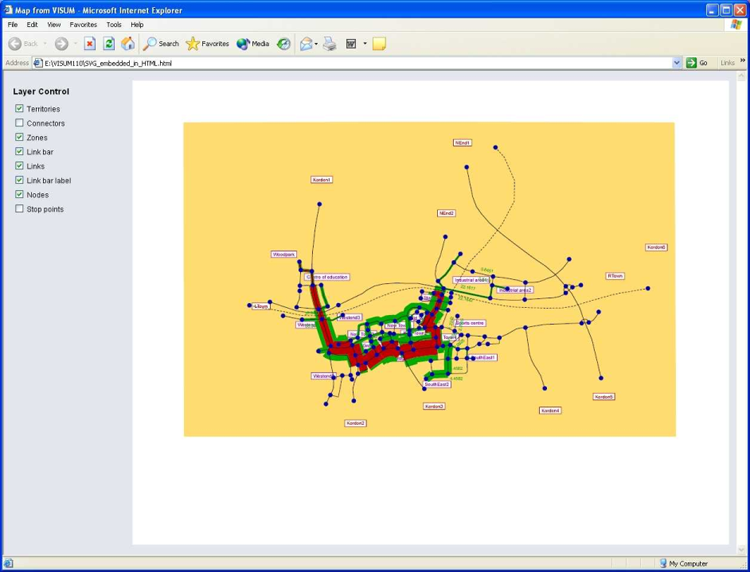
Example of a network display exported in *.svg format
The screen section is saved to an *.svg file embedded in HTML. The layers for the connector and stop point objects are de-activated and therefore not visible.