1. Mark the desired network object (Marking network objects in the network).
2. Make sure that the Permit interactive editing of geometries has been selected (Creating a boundary).
|
Tip: You can also call the Permit interactive editing of geometries via the shortcut menu of the selected network object or from the Edit menu, choose > User Preferences > Network editor. |
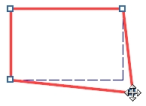
3. Point at the desired polygon point.
The point is highlighted and a move cursor is displayed at the mouse pointer.
4. Click the desired polygon point and hold down the mouse button.
5. Drag the polygon point to the new position and release the mouse button.
|
Tips: If you press the Esc key while dragging, you can cancel the action and the polygon point is reset to its original position. If you want to move a point that is also the point of another surface, hold down the Shift key while moving to detach the point from the other surface. If you do not press the key, the other polygon will be modified as well. |
The polygon point is shifted and the boundary adjusted.
|
Notes: If you shift the polygon point to the position of a point of a different polygon, the polygon points are merged. If you want to avoid merging polygon points, clear the Automatic snapping of vertices option on the toolbar. If you move the polygon point to a polygon point of the same polygon, a minus sign is displayed at the mouse pointer and the moved point is deleted when the mouse button is released. If you hold down the Shift key during the process, an existing joint with a different polygon point will be separated prior to the deletion. If a polygon has only three polygon points, you cannot delete a point. |
6. Shift further polygon points, if required.
7. Confirm with OK.
Depending on the network object type, the following applies:
- In case of zones, territories, and polygonal POIs, the new boundary is created immediately and the step ends here.
- For main nodes, main zones and
8. Confirm with Yes.
The network objects (nodes, zones or links), which lie within the boundary, are allocated to the higher-level network object (main node, main zone or toll system) and the new boundary is saved.
|
Note: If you want to create the main node, the main zone, or |
