If, for a network object, you want to specify a boundary polygon, which consists of several faces, you can create further faces (Fundamentals: The surface data model in Visum).
1. Mark the desired network object (Marking network objects in the network).
2. Right-click in the network display.
3. From the context menu, choose New face.
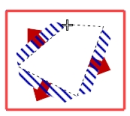
4. Create a new face with consecutive mouse-clicks (Creating a boundary).
The edges of the boundary polygon are displayed as a rubber band. The hatching and the arrows indicate the direction of the face.

|
Note: Depending on the direction in which you create the polygon points, the face either belongs to the total surface or is cut out off another face (hole).
|
5. To confirm the definition of the face, press Enter.
The new face is created.
6. Create further faces, if required.
7. Confirm with OK.
Depending on the network object type, the following applies:
- In case of zones, territories, and polygonal POIs, the new boundary is created and the step ends here.
- For main nodes, main zones and
8. Confirm with Yes.
The partial network objects (nodes, zones or links) that lie within the boundary are allocated to the higher-level network object (main node, main zone, or
|
Note: If you want to create the main node, the main zone, or |
