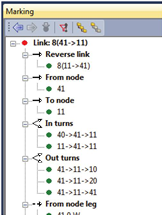
If you have marked one or several network objects, you can easily access associated objects.
1. Mark the desired network object(s) (Marking network objects in the network).
The network objects are marked and highlighted in the network display.
|
Note: You can specify the colors and the line styles for the display of network objects marked in the network and all associated network objects on the Graphics > Edit graphic parameters > menu, Basis > entry, Marking 1 and Marking 2 option (Specifying basic settings). |
2. From the View menu, choose Tool window. Then click Marking.
You see a list of the selected network objects in the navigator.

|
Notes: A red dot indicates an object that is marked in the network. Green dots indicate associated network objects. If a network object is marked, the marked network object will be the first entry in the navigator. All associated objects are arranged in categories and will be listed as subordinated entries. If several network objects are marked, the list of objects will be hierarchical:
Graphic elements that indicate the type of the relation to other network objects are described elsewhere (Selection of attributes). |
In the toolbar of the window, you can use the following icons to edit the display.
|
Icon |
Name |
Description |
|
|
Show only active objects |
Switch on/off so that only active objects will be displayed in the navigator (Using filters to set network objects active or passive and Setting network objects active/passive via the spatial selection). Note The function is activated if the icon is pressed (red). |
|
|
Expand all |
Open all subordinated entries in the navigator Tip If you want to open the subordinated entries one by one, click the |
|
|
Collapse all |
Close all subordinated entries in the navigator Tip If you want to close the subordinated entries one by one, click the |
|
|
Back to previous marking |
Back to previous marked network object |
|
|
Go to next marking |
Go to next marked network object |
3. Click the desired associated object.
The selected network object is highlighted in the network display.
|
Notes: In the navigator, you can also select several objects at the same time if you hold down the Ctrl key while clicking the desired entries. If you click on a category, all objects of the category are selected. |
4. Click the  Mark selected network objects icon.
The selected object is marked in the network. In the Marking window of the navigator, it is displayed at the top of the list of entries. In the Network window, the respective network object type is selected.
|
Tip: Alternatively, you can double-click the desired object. |
|
Note: With the Back to previous marking symbol |
|
Tip: You can edit marked network objects or objects associated with them by right-clicking the object in the navigator and selecting the desired entry in the shortcut menu. The available editing functionalities are identical to those for editing marked network objects in the network display. |
|
Note: In addition to the marked objects, you can highlight those network objects which are network model-related to the marked network object (Showing/hiding extended markings). |


 icon.
icon.
 icon.
icon.


