You can edit the colors of all classes at the same time.
Editing the colors of the classification of a point object
The following example of the network object zone illustrates how to change the colors of the classes.
1. In the navigator, select the Zones > Display entry.
2. Click the black triangle on the Redefine all classes button.
3. Select the Edit the colors for all classes entry.
The Edit classification: Edit the colors for all classes window opens.
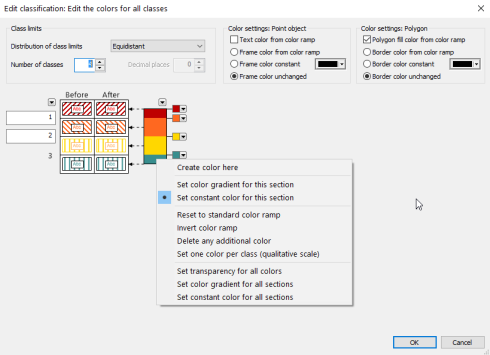
4. In the Color settings: Point object section, specify the desired setting.
|
Element |
Description |
|
Text color from color ramp |
If the option has been selected, the color from the color ramp is used. If the option has not been selected, the color of the previously set color is used. Note Depending on the selected point type, the color is called text color or fill color. |
|
Border color from color ramp / Frame color from color ramp |
For classified symbol or image display you can select the fill color and the border color here. For classified text display you can select the text color and the frame color here. If the option has been selected, the color from the color ramp is also used for the border or frame. |
|
Border color constant / Frame color constant |
If the option has been selected, you can select the color for the border or frame, as applicable, via the color field. |
|
Border color unchanged / Frame color unchanged |
If the option has been selected, the color already set for the border or frame is used. |
5. In the Color settings: Polygon section, adjust the desired settings, if applicable.
|
Note: Here you can specify the polygon fill color and the frame color for the polygons. This section is only available if the network object has a polygon. These options correspond to those for point objects. |
6. Right-click in the color scale.
|
Note: Use the color scale to specify the class colors and distances between the classes. The left column visualizes the current settings, whereas the right column presents the preview for the new settings. |
The context menu opens.
7. Select the desired entry.
|
Element |
Description |
|
Create color here |
Via this entry, you add another color to the selected position in the color scale. Notes To add an additional color, in the color ramp, click the position of your choice (the mouse pointer is then displayed as a plus sign). Then select the desired color. Click the arrow to the right of a color field in order to allocate a new color. |
|
Set color gradient for this section |
Via this entry you decide to connect the two colors next to your click position in the scale by a color gradient. |
|
Set constant color for this section |
Via this entry you decide that the section between the two colors next to your click position will be displayed by the color of the color section on top. |
|
Reset to standard color ramp |
Via this entry, you reset the color scale to a default value. |
|
Invert color ramp |
Via this entry, you rotate the given scale by 180°. |
|
Delete any additional color |
Via this entry, you delete all additional colors. |
|
Set one color per class (qualitative scale) |
Via this entry, you create a qualitative scale for all classes Thus, each class is allocated its own color. |
|
Set transparency for all colors |
Via this slider, you enter a percentage which defines the degree of transparency for the colors in the color ramp. |
|
Set color gradient for all sections |
Via this entry you define that all sections between two colors are to be displayed by color gradients. |
|
Set constant color for all sections |
Via this entry you define that all sections between two colors will be displayed by the color of the color section on top. |
|
Notes: Within the scale, you can shift a color: Keep the mouse-key pressed while dragging the pointer up or down. Alternatively, you can right-click a color and select the Edit position entry: Enter a value between 0.01 and 0.99. To replace a color with an existing color, right-click the Color selection box of the existing color and choose Copy. Then right-click the Color selection box of the color you want to replace and choose Paste. To duplicate an additional color in the scale, press Ctrl and drag it to the position of your choice. To delete an additional color, right-click it and select Delete color. The mouse pointer changes its shape depending on the editing options provided:
If you click the black triangle above the color ramp, you can access further functions. |
8. Confirm with OK.
The settings are applied and displayed in the table.
Editing the colors of the classification of a line object
The following example of the network object link illustrates how to change the classification settings of a line object.
1. In the navigator, select the Links > Display entry.
2. Click the black triangle on the Redefine all classes button.
3. Select the Edit the colors for all classes entry.
The Edit classification: Edit the colors for all classes window opens.
4. In the Color settings section, specify the desired setting.
|
Element |
Description |
|
Line color from color ramp |
If the option has been selected, the color from the color ramp is used. If the option has not been selected, the color of the previously set color is used. Notes In case of several stroke layers the color is called fill color. In case of just one stroke layer, the color is called line color. The following options are available only if several stroke layers have been defined. |
|
Border color from color ramp |
If the option has been selected, the color from the color ramp is also used for the border. |
|
Constant border color |
If the option has been selected, you can select the color for the border via the color field. |
|
Unchanged border color |
If the option has been selected, the color already set for the border is used. |
5. Right-click in the color scale.
|
Note: Use the color scale to specify the class colors and distances between the classes. The left column visualizes the current settings, whereas the right column presents the preview for the new settings. |
The context menu opens.
6. Select the desired entry.
|
Element |
Description |
|
Create color here |
Via this entry, you add another color to the selected position in the color scale. Notes To add an additional color, in the color bar, click the position of your choice (the mouse pointer is then displayed as a plus sign). Then select the desired color. Use the arrow to the right of a color field to allocate a new color. |
|
Set color gradient for this section |
Via this entry you decide to connect the two colors next to your click position in the scale by a color gradient. |
|
Set constant color for this section |
Via this entry you decide that the section between the two colors next to your click position will be displayed by the color of the color section on top. |
|
Reset to standard color ramp |
Via this entry, you reset the color scale to a default value. |
|
Invert color ramp |
Via this entry, you rotate the given scale by 180°. |
|
Delete any additional color |
Via this entry, you delete all additional colors. |
|
Set one color per class (qualitative scale) |
Via this entry, you create a qualitative scale for all classes Thus, each class is allocated its own color. |
|
Set transparency for all colors |
Via this entry, you enter a percentage which defines the degree of transparency for the colors in the color ramp. |
|
Set color gradient for all sections |
Via this entry you define that all sections between two colors are to be displayed by color gradients. |
|
Set constant color for all sections |
Via this entry you define that all sections between two colors will be displayed by the color of the color section on top. |
|
Notes: Within the scale, you can shift a color: Keep the mouse-key pressed while dragging the pointer up or down. Alternatively, you can right-click a color and select the Edit position entry: Enter a value between 0.01 and 0.99. To replace a color with an existing color, right-click the Color selection box of the existing color and choose Copy. Then right-click the Color selection box of the color you want to replace and choose Paste. To duplicate an additional color in the scale, press Ctrl and drag it to the position of your choice. To delete an additional color, right-click it and select Delete color. The mouse pointer changes its shape depending on the editing options provided.
If you click the black triangle above the color ramp, you can access further functions. |
7. Confirm with OK.
The settings are applied and displayed in the table.
