The stop sequence can be edited manually in the graphical timetable. At the top of the timetable, the current stop sequence is displayed as an axis, with the name of the stop points or stops in the currently used sequence. Stops may occur multiple times within a sequence. The rows under the axis depict line route items of the current line selection. The stops serviced by the line route are shown as circles.
Stop events displayed
To move the stop events within the stop sequence, right-click the horizontal axis and open the shortcut menu. The shortcut menu further allows you to add stop events and hide or remove existing ones. The vertical axis also has a shortcut menu that allows you add stop events, provided they are not already serviced by a line route or are included in the current stop sequence.
Assignment of stop events
The graphical display of line routes, with stops shown as circles, is used to assign line route items to stop events of the stop sequence. It allows you to control the display of the corresponding vehicle journeys in the graphical timetable and to specify the rows of the items table for display of the attributes of the respective line route items.
The assigned stop events are highlighted in blue and connected to each other via lines. Unassigned stop events are highlighted in gray and do not have any connecting lines.
To change the assignment of a stop event, click the respective circle. If you remove the assignment of a stop event, it is no longer shown in the timetables of the line route.
If a stop occurs multiple times within a stop sequence (e.g. after hierarchical pre-calculation), it is depicted with multiple circles in the items view. However, only one stop at a time is actively allocated, so that when allocating to another stop the previous allocation is canceled. Exceptions to this rule are stop events that are actually serviced multiple times or so-called twin stop events (Twin stop events). In this case, in the graphical timetable, the assignment determines via which stop events the space-time lines run. And in the tabular timetable, the assignment determines the rows of the items table in which the attributes are output.
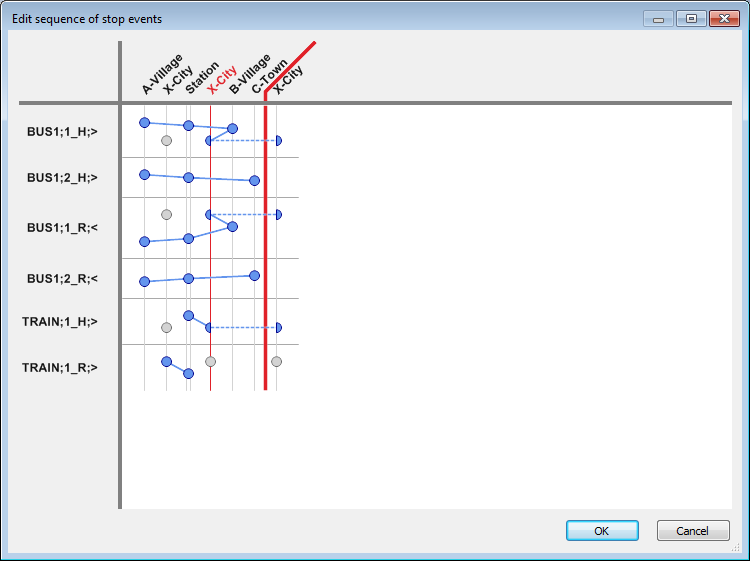
Image 281: Window for graphical editing of the stop sequence
Twin stop events
In some views, it might be required that you do not limit the display to line route items that are only assigned to exactly one stop event. To do so, you can split stop events, creating so-called twin stop events. In the graphical timetable, these are displayed as semicircles. The semicircles are connected via a dashed line (Image 281. You can move other stop events in between twin stop events. This, for instance, allows you to display connections, including arrival and departure times at other train stations. To do so, move the destination station of the connecting line between the two stop events of the transfer stop, and make the appropriate allocations.
Double row display
For display in the tabular timetable, in the items list, use the shortcut menu to set the double-row display per stop event. For stop events with this setting, two adjacent table rows are output, so that you can e.g. list the arrival and departure time underneath each other. In the Edit stop sequence window, these stop events are displayed as a double vertical line Image 281).
