Exporting data for Dashboards
You can export the following data from your Vissim network, display it in the Dashboards app and automatically import it to Dashboards:
- Attribute data for network objects of various network object types
- Simulation runs, if several have been executed and saved
- You can also limit the exported time intervals by selecting a specific time range. Aggregation functions can be applied to the data as needed.
If you have a subscription, this data will be imported automatically to Dashboards after selecting the export data.
- You can also save an animation to a *.dashdata file (Defining an animation recording) and manually import it to PTV Hub in Dashboards (Exporting a *.dashdata file and importing it in Dashboards).
An export limit restricts the amount of data that can be exported. The export limit consists of the maximum possible amount of exported data and other size restrictions. The following applies:
- Limited maximum number:
- Values of subattributes per attribute
- Trajectories
- Attributes per object to which the attribute has a relation
- Columns in Matrix data source
- Values in Matrix data source
- Values in Attribute data source
- the calculated number of exported attributes, including their subattribute combinations, per network object type.
- the calculated number of values for each exported attribute and restrictions imposed by its data source
- Size restrictions for data sources and zip files
During export, the Export limit box in the Dashboards export - Select data window displays the percentage of the export limit that the exported data has currently reached.
Exporting data of network objects, simulation runs and time intervals to Dashboards
1. Make sure that you have selected the evaluations for the network object types that you want to export (Overview of evaluations).
2. Make sure that you have a PTV user account, an e-mail address and a password for PTV Vision Cloud and sign in.
Enter this data as part of the registration process (Signing in to PTV Cloud with PTV user account). The first time you access PTV Hub, you are required to activate a subscription. The subscription is subject to a fee depending on its scope and content. Manage your subscriptions in your PTV user account.
3. On the File menu, click > Export > Dashboards.
The Dashboards export - Select data window opens.
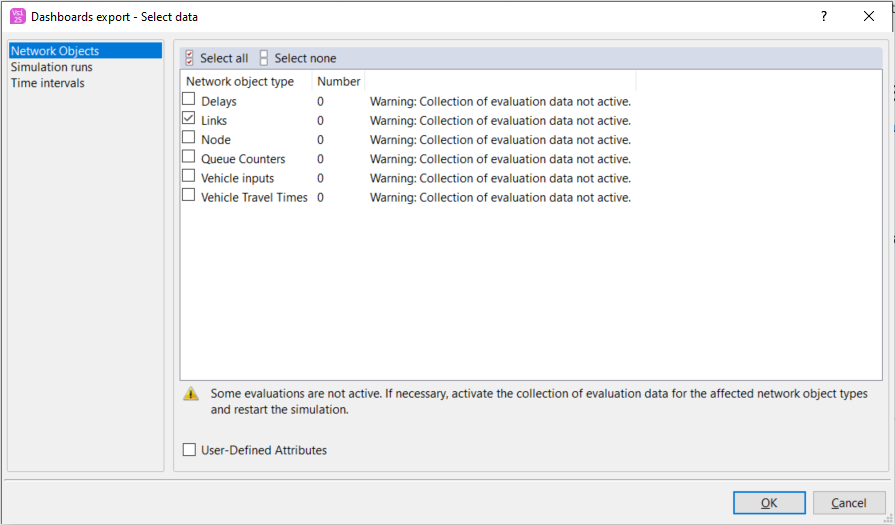
4. In the Network objects and Simulation runs categories, activate the checkboxes for the desired data.
5. If needed, select the preferred time range in the Time intervals category.
6. Additionally, if required, choose aggregation functions and percentiles in the Simulation runs category.

|
Note: Ensure that the selected data does not exceed the Export limit! |
7. Confirm with OK.
When you export a scenario management project, the Dashboards export - Select scenario window opens
8. Make the desired changes:
| Element | Description |
|---|---|
|
Workspace |
Workspace in PTV Hub Dashboards to which you want to allocate the exported network model after uploading it. Default setting is Common workspace. If additional workspaces have been created in your PTV Hub instance in Dashboards, they will be displayed. |
|
Scenario for upload |
Model and scenario in PTV Hub Dashboards into which you want to upload the exported network model. If models and scenarios are stored in your PTV Hub instance in Dashboards, they will be displayed one below the other. |
|
Add model |
Creates a new model in Dashboards to which you add a new scenario. The exported network model is uploaded to the new scenario. |
|
Add scenario |
Adds a new scenario to the model you selected. You can upload the exported network model to the new scenario. |
9. Click Export.
The data is exported, imported in PTV Hub in Dashboards and displayed in the table on the Data tab.
Exporting a *.dashdata file and importing it in Dashboards
You can only import a *.dashdata file containing data from an animation in Dashboards manually.
1. Make sure you have saved the *.dashdata file from Vissim (Defining an animation recording).
2. In Dashboards, make sure that at least one scenario has been created in the model into which you wish to import the *.dashdata file.
3. In the browser, open PTV Hub and select the Dashboards app.
4. Click the Data tab.
5. In the model row, click  .
.
The corresponding scenarios are displayed line by line below the model.
6. In the row of the desired scenarios, click  Add data manually.
7. In the Upload data window, select the desired *.dashdata file.
8. Click Upload.
The data is imported to PTV Hub in Dashboards and displayed in the table, in the Data tab below the scenario  Dashboards Help: Manage models and scenarios.