Defining a 3D traffic signal in the Network editor
1. On the network object sidebar, click 3D Traffic Signals.
|
|
Notes:
|

2. In the network editor, hold down the Ctrl key and right-click the position where you want to add the 3D traffic signal.
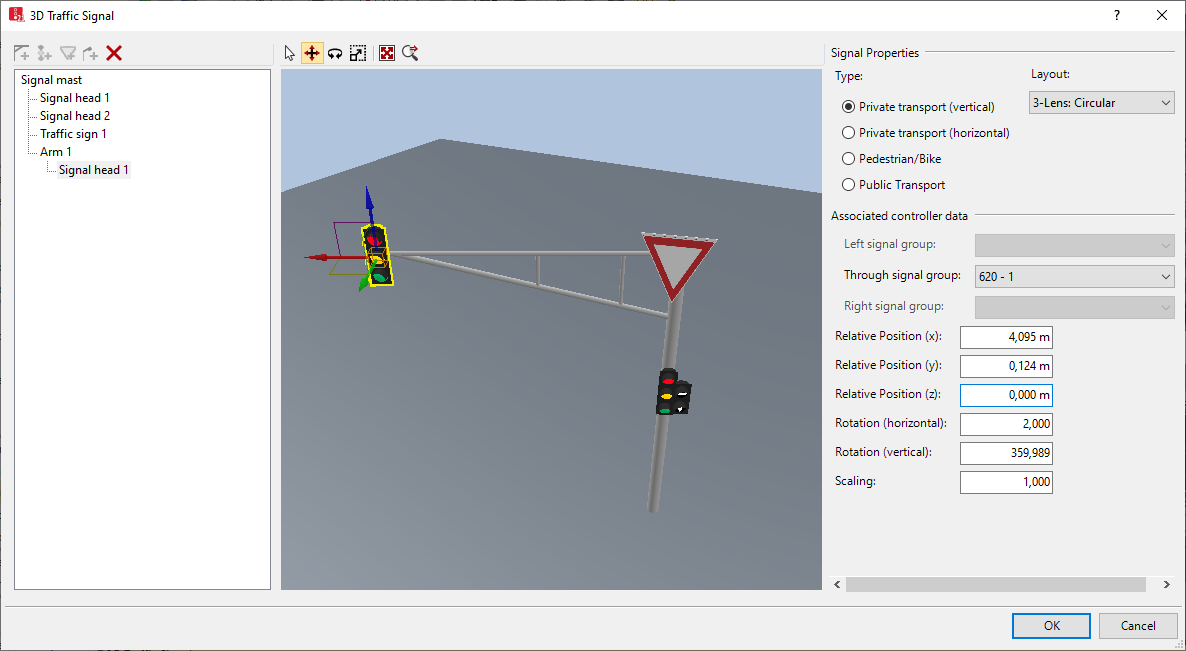
The 3D Traffic Signal window opens. In the window, add an arm, a signal head, a sign and/or light to the signal mast. Then arrange the objects and edit their attributes (Attributes of 3D traffic signals). The 3D Traffic Signal window contains the following sections:
- Section on the left: default entry Signal mast. If you have added an arm, signal head, sign, or light to the signal mast, this is indicated below it. The number added to the name facilitates the identification of the element.
- 3D view in the middle: displays a preview of the signal mast with the elements added. Above the 3D view, you will find a toolbar with functions that allow you to edit the elements.
- Section on the right: If an element has been selected in the section on the left or in the preview, the attributes of this element are displayed here (Attributes of 3D traffic signals).
The figure shows the 3D Traffic Signal window, displaying a signal mast with an arm, three signal heads and a traffic sign. Several attributes of these elements were edited. The signal head at the signal arm is selected. On the toolbar, you have enabled the Move button.
Adding arms, signal heads, signs, or street lights
You can align one or several of these elements with the signal mast and edit their attributes. If you add an arm, you can align one or multiple elements with it.
1. In the section on the left, click Signal mast.
The symbols above the left section are enabled. You can select one symbol at a time.
2. If you have already added an arm and would like to align an element with it, in the section on the left, below the Signal mast <No>, click the SignalArm <No>.
3. On the toolbar, click the button of your choice.

|
Arm |
|---|---|

|
Signal head |

|
Sign |

|
Street light |
The element is inserted and activated in the preview.
The attributes are saved in the 3D Traffic Signals list.
In the 2D mode, in the Network Editor, the contour or outline of the 3D model is displayed.
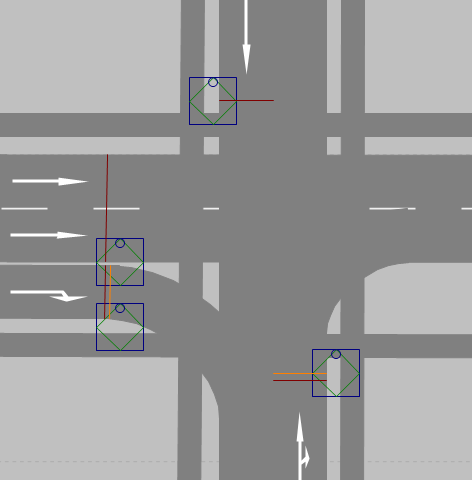
| Legend | |
|---|---|
| Element | Description |
| Square |
|
| Circle |
Mast |
| Red line |
Direction and length of signal arm |
| Blue arrows on the signal arm |
Signal Heads |
| Navy blue circles |
In 2D mode: Signal head directly on the mast |
In the 3D mode, in the Network Editor, the 3D model is displayed and selected.
Zooming into the 3D view
- ► Enlarging the view: Rotate the mouse wheel forward.
- ► Minimizing the view: Rotate the mouse wheel backward.
Editing elements in the 3D view
Functions available on the toolbar (Editing 3D traffic signals):
Deleting arms, signal heads, signs, or street lights
1. In the section on the left, under Signal mast, click the SigalArm <No>, Signal head <No>, Traffic sign <No>, or Street light <No> of the element you want to delete.
2. On the toolbar, click the  button.
3. Confirm with OK.
Adding a new 3D traffic signal for signal head
You can define a 3D traffic signal at the marker of signal head, once the signal head has been defined in the Network editor (Adding a new 3D traffic signal for signal head).
