Defining a storyboard with keyframes
You can assign keyframes to a storyboard whose camera positions were all defined in either 2D mode or 3D mode. Keyframes with camera positions from 2D mode and 3D mode cannot be used together in a storyboard.
1. Make sure you have selected the desired mode 2D or 3D (Network editor toolbar).
2. Set the desired camera position, in 3D mode, for example, using the Rotate mode (3D) button  and the mouse.
3. On the Presentation menu, click > Storyboards.
The Storyboards list opens. In the Relations list box, the entry <Single List> is shown.
By default, you can edit the list (Using lists).
4. In the list, on the toolbar, click the Add button  .
.
A new row with default data is inserted.

|
Note: In lists, you can use the |

5. Make the desired changes:
| Element | Description |
|---|---|
| Resolution |
Resolution in pixels Resolution (x) x Resolution (y), e.g. 1920 x 1080 (Full HD) |
| ResX | Horizontal resolution (x), e.g. 1,280 |
| ResY | Vertical resolution (y), e,g, 780 |
| RecVideo | Record Video:  Select this option to create a video recording for the storyboard. Select this option to create a video recording for the storyboard. |
| VideoFormat |
Video Format: Encoding of the video file, depending on the ffmpg library installed:
Make sure you have installed the plugin for your video editing software that allows you to open the video file in the selected file format. Example: You want to open videos in the MPEG-4 part 2 format with VirtualDub (external site: https://sourceforge.net/projects/virtualdubffmpeginputplugin/). Download the Zip file. Depending on your VirtualDub version, copy the files from the corresponding plugin folder to the plugin folder in the VirtualDub directory. The next time you open VirtualDub, the MPEG4 files are listed in the Open file window. |
| Framerate | Frame rate (fps), default 20 images per second |
| Filename | Path and file name of video file |
| RealTmFact | Real time factor = Framerate / Simulation resolution (Defining simulation parameters). Default 2.0 |
| NetLayout | Select the named network editor layout for the beginning of the storyboard (Using named Network editor layouts) |
| Name | Name of storyboard |
| No | Storyboard number |
| ShowPrev | Show preview: While recording a simulation, you can show a preview of the film in a window. |
| PrevZoomFact | Preview zoom factor for film preview (default value 1) |
In the Storyboards list, you can select additional attributes. Among them are the following for example:
| Element | Description |
|---|---|
|
Recording scope |
RecScope: Defines the simulation run that is recorded during a multiple simulation.
|
You can define keyframes for the storyboard:
6. In the Relations list box, click Keyframes.
The right-hand list is shown. If there is no assignment, only the column titles are shown.
7. In the list on the left, click the storyboard for which you want to define keyframes.
8. In the list on right, on the toolbar, click the Add button .
A new row with default data is inserted.
The Keyframe window opens.
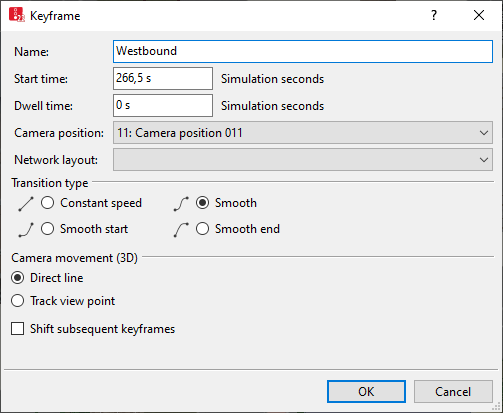
9. Make the desired changes:
| Element | Description | ||
|---|---|---|---|
|
Name |
Name of keyframe.
|
||
|
StartTime |
Simulation second during which the keyframe is started Start time = 0: Keyframe starts when on the Presentation menu, you click > Record Video. If Start time = 0 is not defined for any keyframe, but instead start times > 0 are defined for all keyframes, the recording starts with the keyframe for which the shortest start time has been defined. Changing the StartTime also allows you to move the order of the keyframe in the list. |
||
|
DwellTime |
Time period during which simulation is viewed from this keyframe position. |
||
|
|||
|
CamPos |
Select camera position (Attributes of camera positions):
The Graphics Mode attribute of the first camera position you select also specifies that all subsequent camera positions you select for keyframes of this storyboard must conform to the same graphics mode. Keyframes with camera positions from 2D mode and 3D mode cannot be used together in a storyboard. |
||
|
NetLayout |
Select named network editor layout for the beginning of the keyframe (Using named Network editor layouts) | ||
|
TransTime |
Transition time between two keyframes, which is automatically calculated as the difference of StartTime and DwellTime of the current keyframe and the StartTime of the next keyframe. Overlapping keyframes cannot be added to the list. |
||
|
TransType |
Transition types, in the Movement section, define the motion between the current and next camera position of the keyframe.
You can use the latter two options to define a keyframe without DwellTime as "intermediate point" between a movement of keyframes, e.g. in order to create an effect on the distance. |
||
|
Example: Transition types Smooth start, Smooth end: If keyframe 2 is an intermediate keyframe with a DwellTime of 0 s, then the movements could be defined as follows: Keyframe 1: Smooth start Keyframe 2: Smooth Keyframe 3: Smooth end |
|||
|
CamMov3D |
Camera movement (3D): Type of automatically calculated path along which the camera moves to the camera position of the next keyframe.
|
||
|
Shift subsequent Keyframes |
∆t = start time of new KF + DwellTime of new KF + movement time of previous KF - start time of next KF By adjusting the start time of the next keyframe accordingly, Vissim ensures that the (calculated) movement time is retained until the keyframe following the added keyframe is reached. It thus remains the same as before the new keyframe was inserted.
∆t = new start time – old start time + new DwellTime – old DwellTime
|
||
10. Confirm with OK.
|
|
Tip: You can apply the camera position of a keyframe to the current network editor:
|

Superordinate topic:
