Starting AVI recording
1. Ensure that the following requirements are met:
- At least one camera position is stored in a keyframe (Saving camera positions). If multiple camera positions are assigned, they were all defined either in 2D mode or all in 3D mode. In a storyboard, a combination is not possible.
- You have saved at least one storyboard (Using storyboards and keyframes).
- The storyboard has been assigned at least one keyframe.
- In the keyframe, the attributes Start time, Dwell time, Transition type and Transition time are defined and have been assigned a camera position.
2. In the Storyboards list, click the storyboards of your choice and select  RecAVI (Record AVI).
3. On the Presentation menu, click > Record AVIs.
In the Presentation menu, Record AVIs is marked with .
4. Start the simulation (Running a simulation).
If you have not started AVI recording for the current network files yet, the window Video Compression opens. An *.avi file requires approx. 20 MB/s. On your computer there may be several compression programs installed by default (Selecting a compression program).
Codec x264 provides an excellent quality for smaller files x264vfw.sourceforge.net. For further information, please visit our webpages at: PTV Vissim FAQs (#19283).
|
|
Notes:
|

5. For a minimum file size, in the Compressor list, click a compression program.
6. In the Compression Quality box, enter a value of your choice.
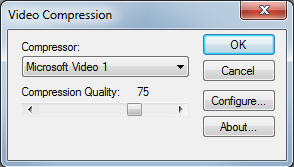
7. If the compression program can be configured, the Configure button is activated and you can make additional settings.
8. Confirm with OK.
|
|
Tip: You may specify a default compression program (Selecting a compression program). |

The simulation starts. If the Preview option has been selected for the storyboard, a window opens in which the movie is shown. The *.avi file is recorded during the simulation run. At the end of the simulation, the *.avi file is saved in the same directory as the *.inpx network file.
9. To stop AVI recording before the end of the simulation run, on the Presentation menu, click > Record AVIs.
In the Presentation menu, Record to AVI is deactivated. The attribute RecToAVI (AVI recording ) of the storyboard is deactivated.
10. To stop the simulation, on the Simulation toolbar, click the Stop button  .
.
|
|
Note: The recording of an *.avi file may take considerably longer than a simulation in 3D mode, particularly if from the Presentation menu, you chose > 3D-Anti-Aliasing. This option corresponds to the Anti-aliasing option under User Preferences (Selecting a compression program). |
Superordinate topic:
Recording a simulation and saving it as an AVI file
Related topics:
Attributes of camera positions