Anchoring windows
You can anchor windows such as network editors, lists, bars, Smart Map and Quick View or display them together in one area. Vissim assists you with visual aids. An icon and a colored shadow show you where you can anchor the window.
|
|
Note: Changing program elements or shortcut keys can make it more difficult for you to find and use commands. The documentation and the PTV Vision Support assume that the standard settings are used. |

1. Click on the title bar or the tab for the window and hold the mouse button pressed.
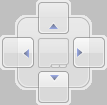
If you move the mouse, an icon is displayed, which shows you the possible anchoring positions:
| Element | Description | ||
|---|---|---|---|
|
|
||

|
Anchoring the window at the top edge of the destination area | ||

|
Anchoring the window at the bottom edge of the destination area | ||

|
Anchoring the window at the left-hand edge of the destination area | ||

|
Anchoring the window at the right-hand edge of the destination area |

2. Drag the mouse pointer to the desired icon.
The desired target area is given a colored shadow.
|
|
Note: The icon which you drag with the mouse pointer is decisive, not the position of the window. |
3. Release the mouse button.
The window is anchored at the desired position.
You can restore the default settings (Resetting menus, toolbars, shortcuts, and dialog positions).
If several window are anchored together in an area, they are shown as tabs.