Using the Network object toolbar
The network object toolbar contains a list with the network object types. In a network editor, you can use icons and the context menu to access functions for the display, selection, and editing of network objects. Your settings are only active in the last network editor used. If you click another network editor to activate it, in the network objects toolbar, the settings for this network editor are displayed.
|
|
Tip: By default, the network object bar, the level bar, the 3D information sign bar and the background bar are aligned with each other. Using the tabs at the bottom of a toolbar, you can switch to another toolbar. |

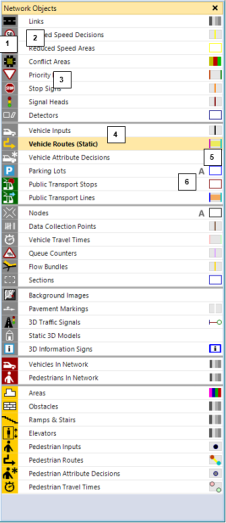
Elements in the network objects toolbar
(1) Network object type button (visibility)
- The icon (and name) of the network object type are shown in color: Network objects of this network object type are shown in the Network editor.
- The icon (and name) of the network object type are grayed out: Network objects of this network object type are not shown in the Network editor.
(2) Lock button (selectability)
The icon is shown only when you position the mouse pointer before the name or on the name of the network object type or when the lock is locked.

|
Lock unlocked: You can select and edit network objects of this network object type in the Network editor. |
|---|---|

|
Lock locked: You cannot select or edit network objects of this network object type in the Network editor. |
(3) Button with the name of the network object type (Insert mode)
Click the button with the name of the network object type to activate the Insert mode. If the Insert mode is activated, the entire row is highlighted in orange.
- You can insert new network objects of this network object type into network editors.
- The network objects of this network object type are visible and selectable in all network editors.
- You can switch off visibility and selectability only for the other network object types.
(4) Selecting variants of a network object type
If you click the button of a network object type that has variants, the variant that is currently selected is shown in brackets together with the icon  . If you click the button or icon again, you can select a different variant to add a network objects of this network object type to a network editor.
- Vehicle Routes:
- Static
- Partial
- Partial PT
- Parking Lot
- Dynamic
- Closure
- Managed Lanes
- Areas:
- Polygon
- Rectangle
- Obstacles:
- Polygon
- Rectangle
- Sections:
- Polygon
- Rectangle
(5) Edit graphic parameters icon: Open preview and graphic parameters
This icon shows you how network objects of this type are displayed in the Network editor. The icons of network object types, displayed differently depending on the attribute values, consist of several colored bars. Four gray bars indicate that the Display type is activated (Defining display types).
Click the symbol to open a list of graphic parameters of the network object type. In the list, you can select and edit graphic parameters (Editing graphic parameters for network objects), (List of graphic parameters for network objects).
(6) Label icon
This icon is shown only when you position the mouse pointer on the name or next to the name of the network object type.
Click this icon to show or hide the label of the network objects of this network object type:

|
Label is hidden |
|---|---|

|
Label is shown |
Context menu in the network object toolbar
In the context menu, you can select functions for visibility and selectability and call the list of network objects of the selected network object type (Context menu in the network object toolbar).
Changing the display of the network object toolbar
You can customize the position, size, and visibility of the window (Changing the display of windows).
Superordinate topic:
Principles of operation of the program
Information on editing:
Capturing screenshots and exporting images
Related topics: