A demand event allows to model a change in the “demand” associated to a “special event”, insisting on a specific zone (for example, a football match). In this case, an abnormal traffic is generated (attracted) from (to) aspecific zone.
To set a demand event, click on DEMAND accordion pane.
You can set several attributes, grouped in the listed accordion panes:
- Event Source
- Validity
- Location
- Description
You can open any section and set the related attributes in any sequence.
When you have set the necessary attributes, click Save to confirm.
Important: It is mandatory to set some attributes. If the mandatory attributes are not set, they are indicated in RED and marked with a warning sign. In this condition, the configuration of the event can not be saved.
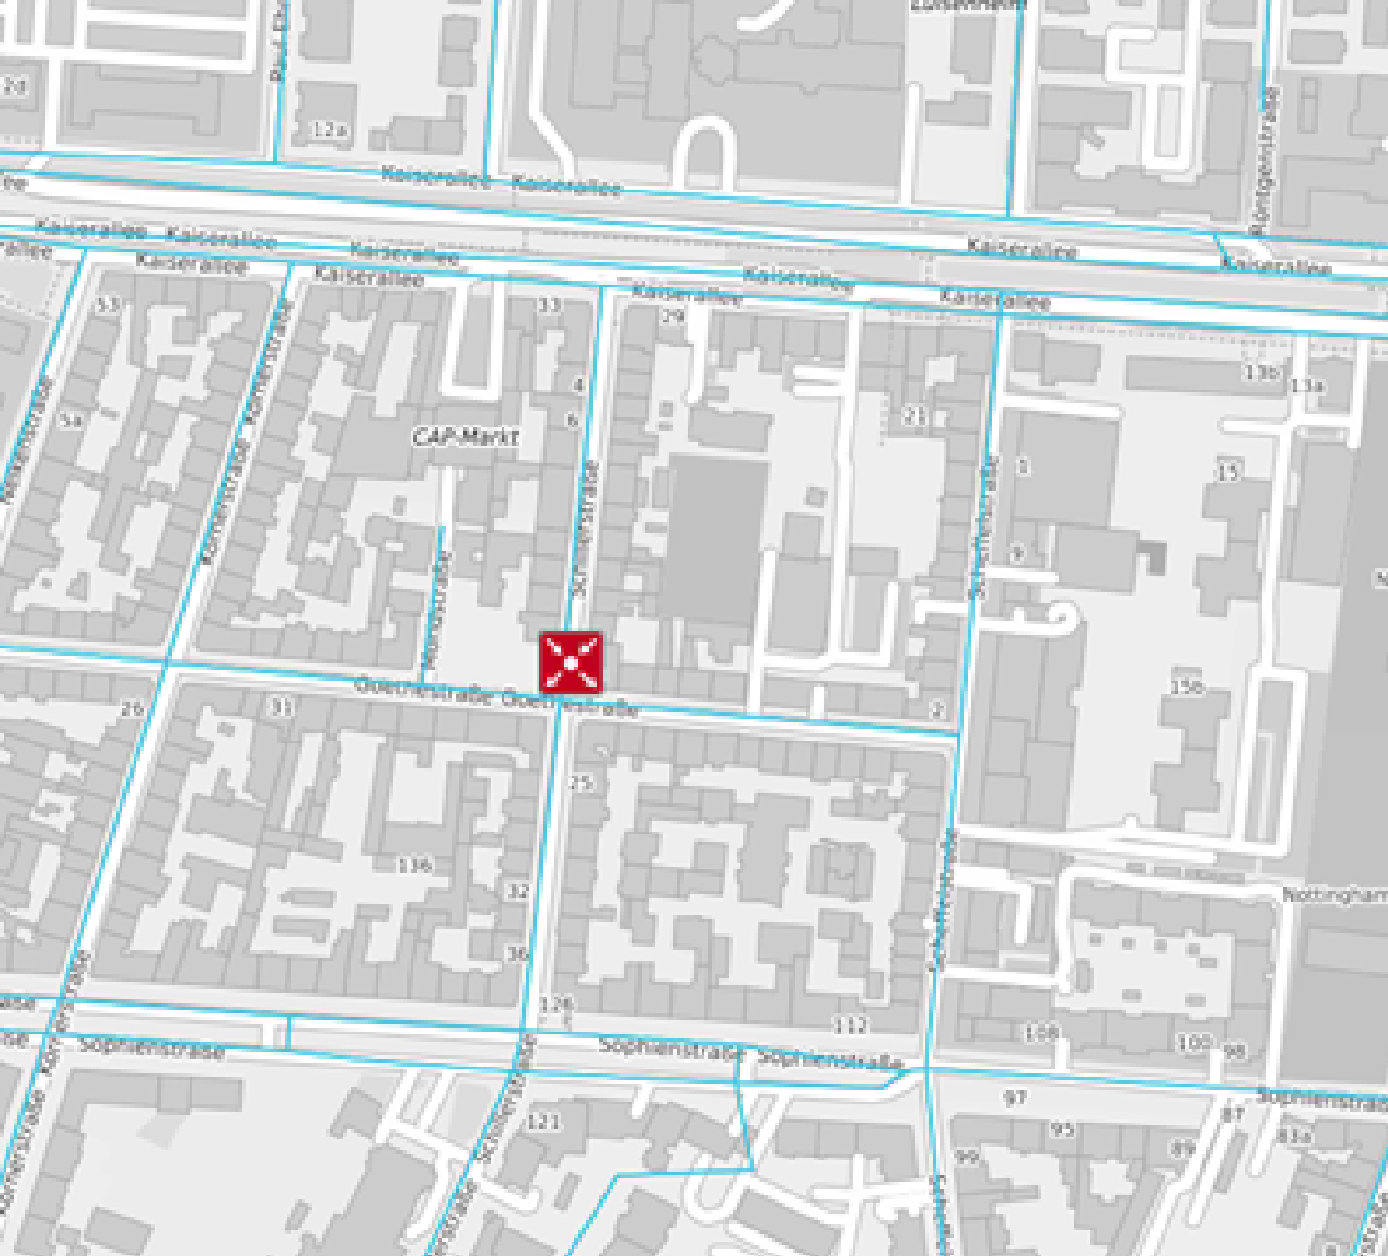
Once the event is completely defined and saved, it is shown on map with a specific icon:
Set the events source.
|
Option |
Description |
|---|---|
|
Source |
Select the desired event source from the set of values listed in the combo-box. By default, OPTIMA is selected. |
|
Internal source |
Select an internal source from the list, for internal use only. You can also add a new source by typing a name; click Enter and OK to confirm the new internal source. Important: You can not remove an internal source just added. |
|
Source internal notes |
Add notes to the internal source, if necessary. Tip: These notes are related to the edited event only, not to the source itself. |
Enter the time period of validity of the event.
|
Option |
Description |
|---|---|
|
Active |
By default, the event is set to active. An inactive event has no effect on the forecast engine, the shortest path search. etc. |
|
Start date / Start time |
By default, start date and start time are set to the current system time. The time provider system is set during the configuration phase. |
|
End date / End time |
You can set a specific time period (for example, from 2 AM to 5 AM). |
The duration of the event can not overcome the 24 hours. If you try to set a greater time duration, the section label become RED and:
-
A diagnostic tool-tip is shown.
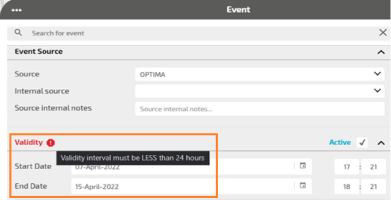
- You can not save the event settings.
You can manage different location entities:
- On map, displayed as a polygonal area.
- By attribute, displayed as a list of elements associated to colored dot.
If you don not select the zone, a specific diagnostic tool-tip is shown.
|
Option |
Description |
|---|---|
|
ON MAP |
You can define an event working directly on the map. You can define an area and, into the area, you can select a zone associated to a specific centroid |
|
BY ATTRIBUTE |
You can define the event associating a classified attribute (green centroid on the map → Setting the event: BY ATTRIBUTE). |
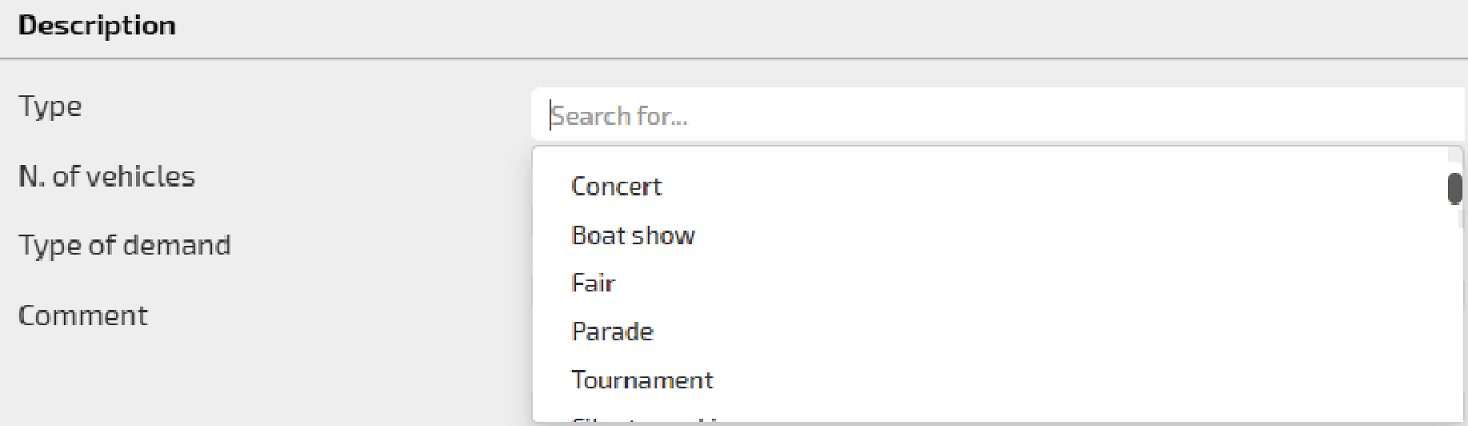
The event can be described setting several attributes.
|
Option |
Description |
|---|---|
|
Type |
In the drop-down menù you can select the type of demand event. |
|
N. of vehicles |
Number of vehicles =>0, involved in the demand event. |
|
Attracts traffic |
Boolean value to distinguish the traffic direction associated to the demand:
|
|
Comment |
You can add a comment to be published. |
Event operations
Several operations are available for the management of an event.
You can unpublish an event.
Tip: An unpublished event can be both active or inactive.
-
On the map, click the event icon.
The Event window opens.
-
In the section Publication Validity, deselect the Publishable check-box.
The check-box label turns to Not Publishable and is colored in red.
-
Click SAVE.
An unpublished event is not displayed on Virtual Message Signs (VMS) panels, but is represented on the map.
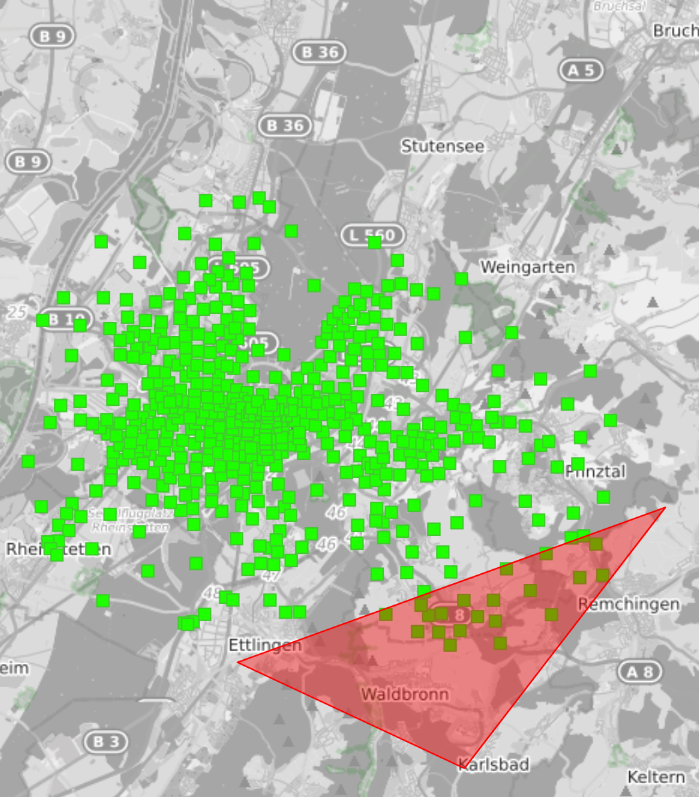
You can set different types of event geometries directly on the map and using the mouse.
-
On the map, click the event icon.
The Event window opens.
-
Click the Location accordion pane.
The accordion pane opens.
-
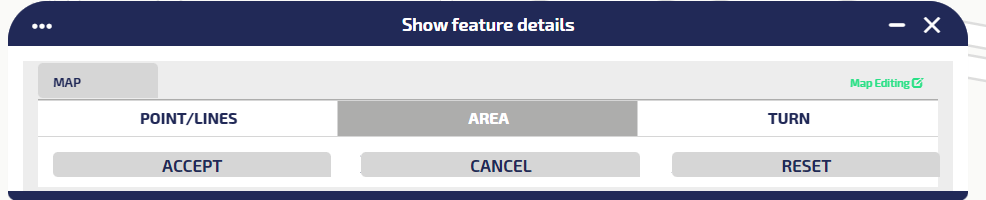
Click ON MAP.
The associated pane opens.
-
Define the area:
- Click AREA.
-
Use the mouse to define a single polygon on the map:
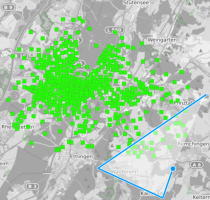

- Click CHECK.
-
Click ACCEPT to confirm the geometry of the event.
-
Click SAVE.
Important: For setting an entity, you must click ACCEPT. For disabling an accepted action, click RESET.
-
The list of "green centroids" (attributes) included into the area are scrollable under the ON MAP button.
-
Select one of the attributes.

You can set different types of event geometries directly on the map and using the mouse.
-
On the map, click the event icon.
The Event window opens.
-
Click the Location accordion pane.
The accordion pane opens.
-
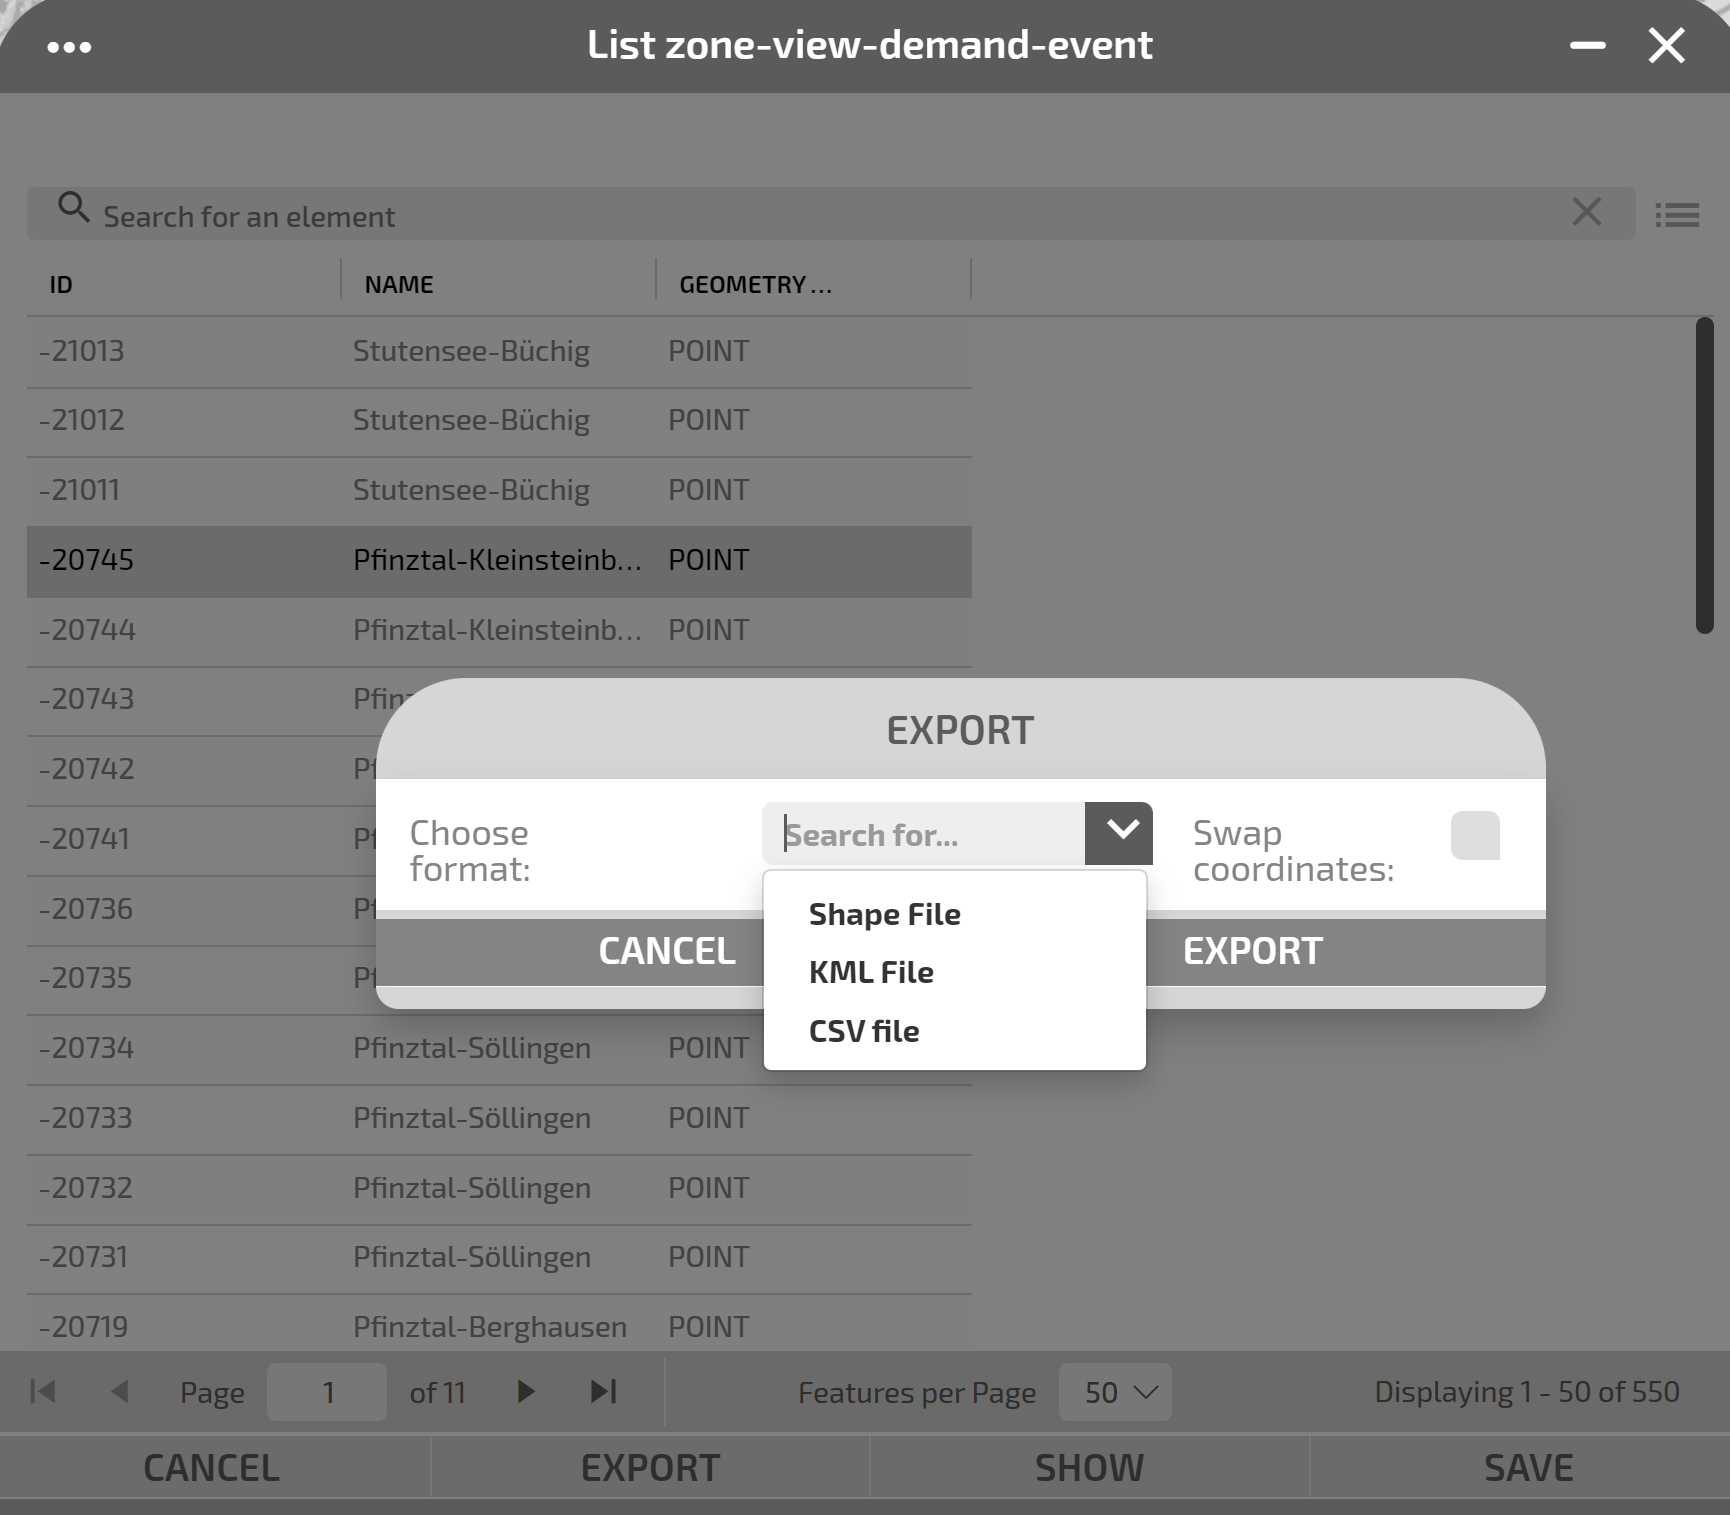
Click BY ATTRIBUTE.
The associated pane opens, listing the attributes associated to the zones indicated on the map (green centroids).

- Click SHOW to highlight the zone.
-
Optional: click EXPORT to save the event in three different formats:
- Shape
- KLM
- CSV

- Click SAVE to save the location.

In the bottom Buttons Bar you can select different operations.
Every operation acts on the whole set of attributes previously set in the GUI.
You can delete an event displayed on the map that hosts an active instance of the layer Events.
-
On the map, click the event icon.
The Event window opens.
-
Click DELETE.
A pop-up window opens.
- Click OK to confirm the deletion.
The icon of the event is deleted from the map.
You can save a template based on an event configuration. A template represents a repeatable "model" for the definition of similar events. Saved templates can be loaded to speed up the configuration of a new event.
-
On the map, click the event icon.
The Event window opens.
-
Open one or more sections and set the attributes of the event.
A pop-up window opens
-
Click TEMPLATE > Save as template to save the current attributes as a template that can be retrieved and updated.
Important: You can save different templates with the same name (templates are associated with different internal identifiers), but this is not considered a best practice.
You can load a saved template.
-
On the map, click the event icon.
The Event window opens.
-
Click TEMPLATE > Load template to load a stored template.
You can select one template from the list of available templates.
-
Click the Load icon to load it in the related template.
The Event Situation GUI is set with the attributes of the loaded template.
The preview of an event provides a short description of the event.
-
On the map, click the event icon.
The Event window opens.
-
ClickPREVIEW.
A pop-up window opens and displays some base information associated with the event.
You can determine the end of an event.
-
On the map, click the event icon.
The Event window opens.
-
Click END.
The event icon is grayed.
You can update only the update time associated with the event. The update time can be used by external agents for their purposes.
-
On the map, click the event icon.
The Event window opens.
-
Click UPDATE.
A pop-up window opens and confirms the success of the operation.
Tip: When you save an event, you update ALL the information associated with the event.
You can update an event displayed on the map that hosts an active instance of the layer Events.
-
On the map, click the event icon.
The Event window opens.
-
Open one or more sections and set the attributes of the event.
- Click SAVE to confirm all settings.
All data set in the Event window are saved.
Tip: Some attributes are mandatory. If the mandatory attributes are not set, they are indicated in RED and marked with a warning sign. In this case, the configuration of the event can not be saved.