Optima can be widely scalable according to a flexible architecture.
In this case, we provide an example based on scaling of GeoServer module, but the mechanism of scaling can be applied to different Optima modules.
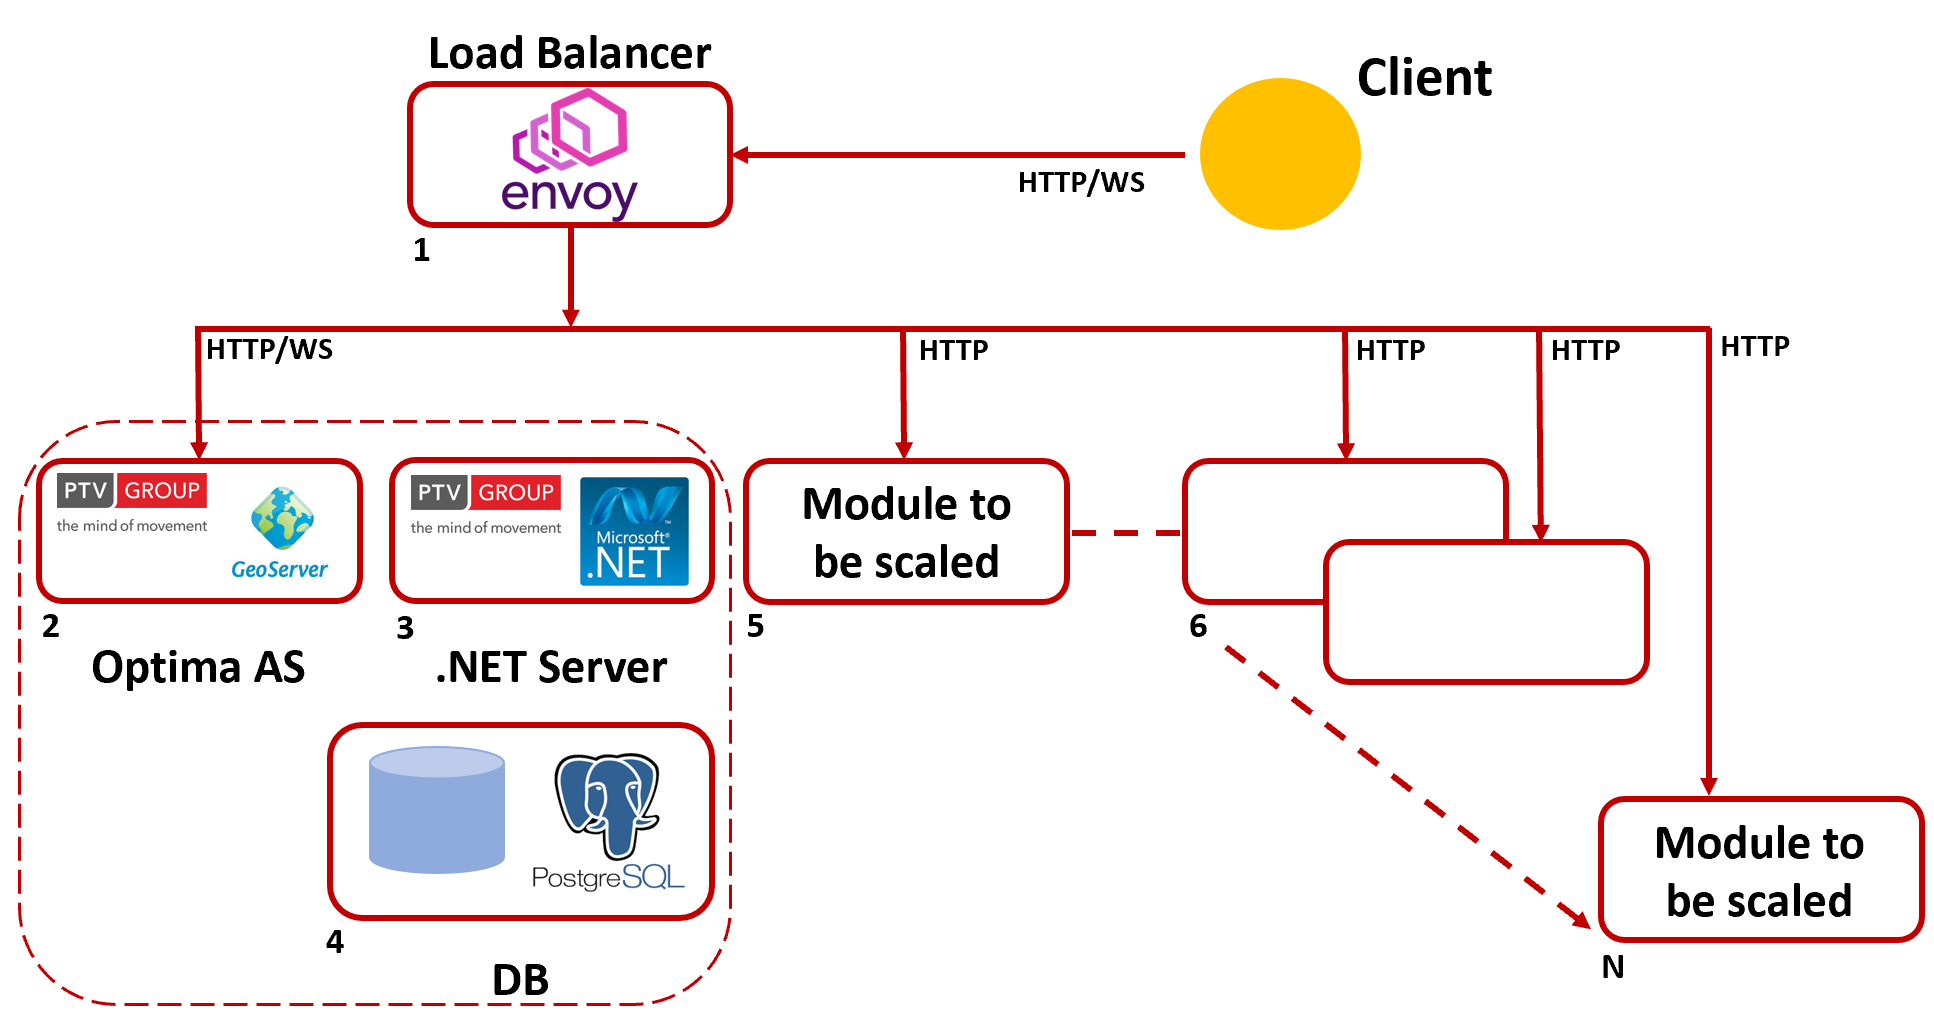
The architecture is based on a single Envoy Proxy access point that handle all the requests and also balance them between the GeoServer instances.
Scaling GeoServer: Option 1
In this first option you have at least 5 machines:
| Machine | Description |
|---|---|
|
1: Envoy Proxy |
Contains a Docker instance of Envoy Proxy acting as gateway proxy and load balancer. |
|
2: Optima AS + GeoServer |
Optima Application Server based on Linux OS. |
|
3: .NET |
Optima .NET components based on Windows .NET Server. |
|
4: DB |
DB PostgreSQL based on Linux OS. |
|
5: GeoServer + WSI |
Contains a Wildfly instance (as the machine 2), hosting Geosever and Optima WSI. |
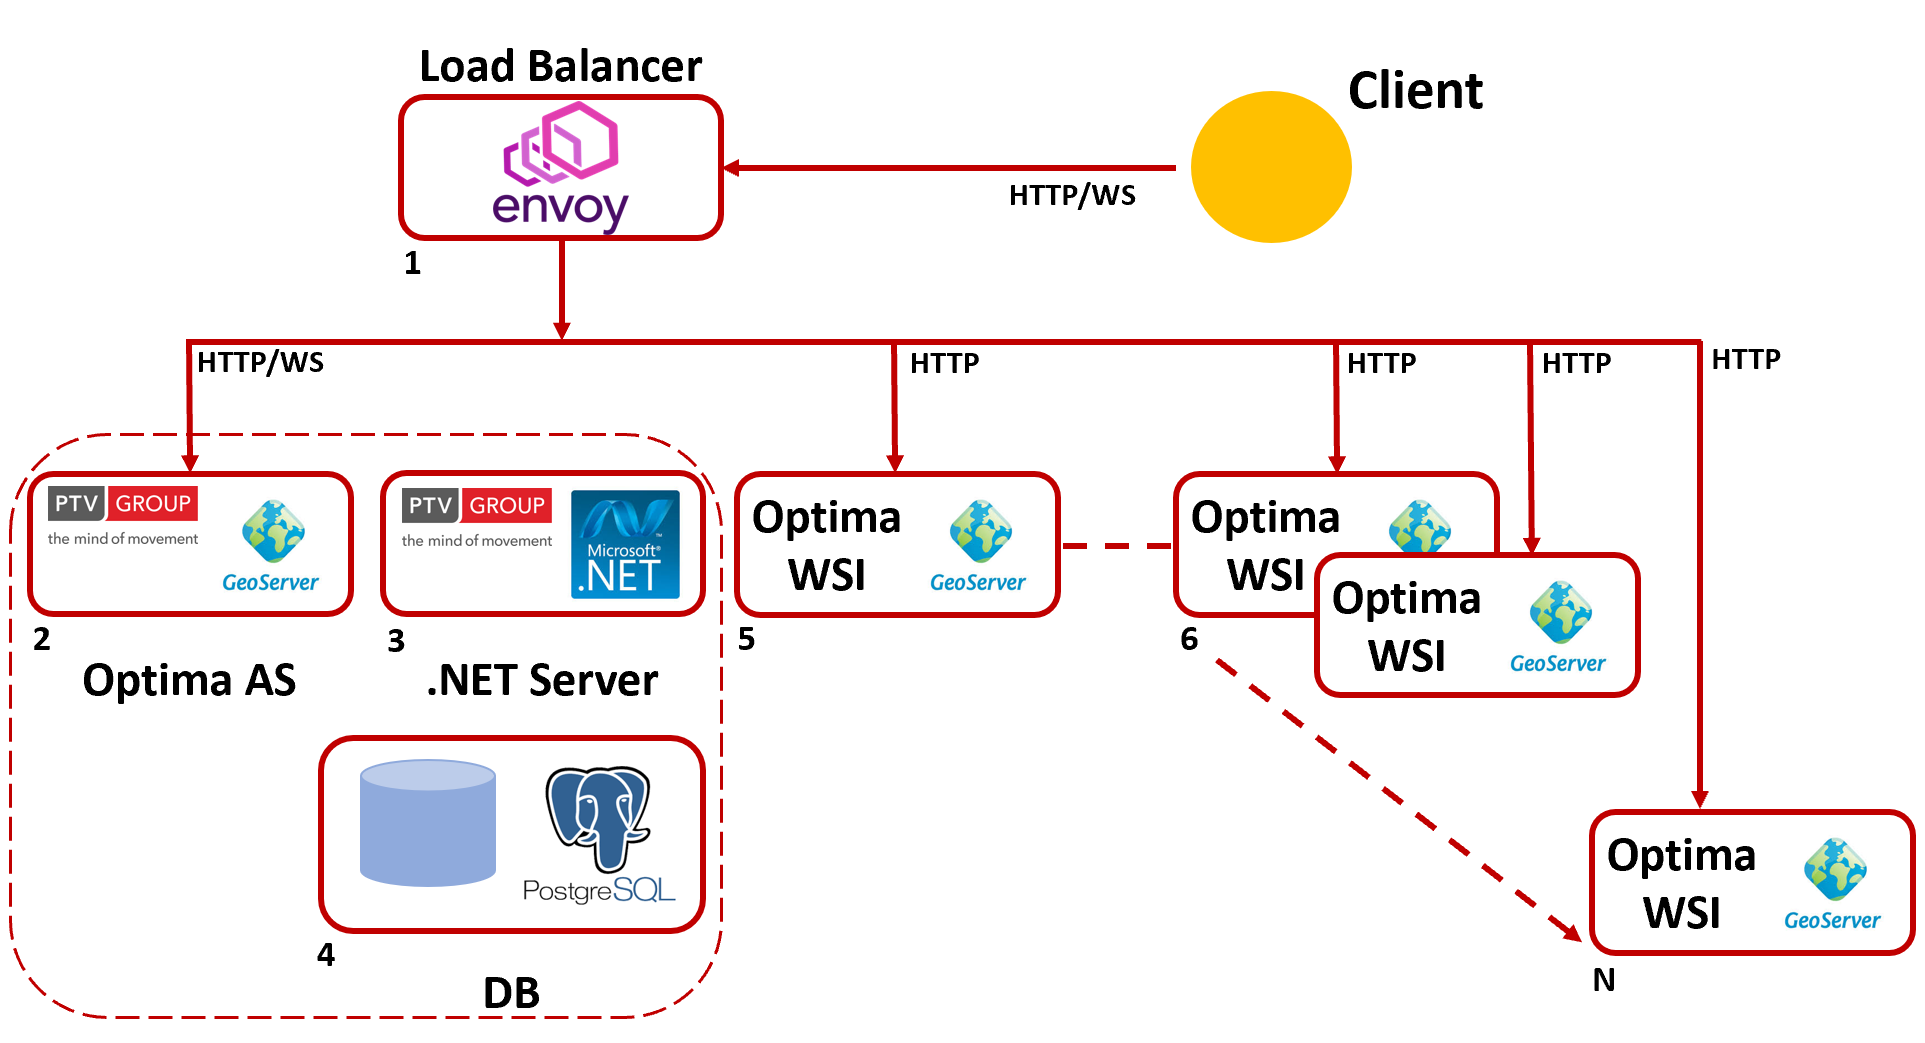
The machines 2,3 and 4 are installed according to → Installing Optima on three servers, but on the Optima AS machine must be installed also GeoServer.
On the machine 5 is present also Optima WSI, to provide authentication services (in particular, the service of token validation).
Scaling GeoServer: Option 2
In this second option you have at least 5 machines:
| Machine | Description |
|---|---|
|
1: Envoy Proxy |
Contains a Docker instance of Envoy Proxy acting as gateway proxy and load balancer. |
|
2: Optima AS |
Optima Application Server based on Linux OS. |
| 3: .NET |
Optima .NET components based on Windows .NET Server. |
| 4: DB |
DB PostgreSQL based on Linux OS. |
| 5: GeoServer | Contains a GeoServer Docker container running on Tomcat. |
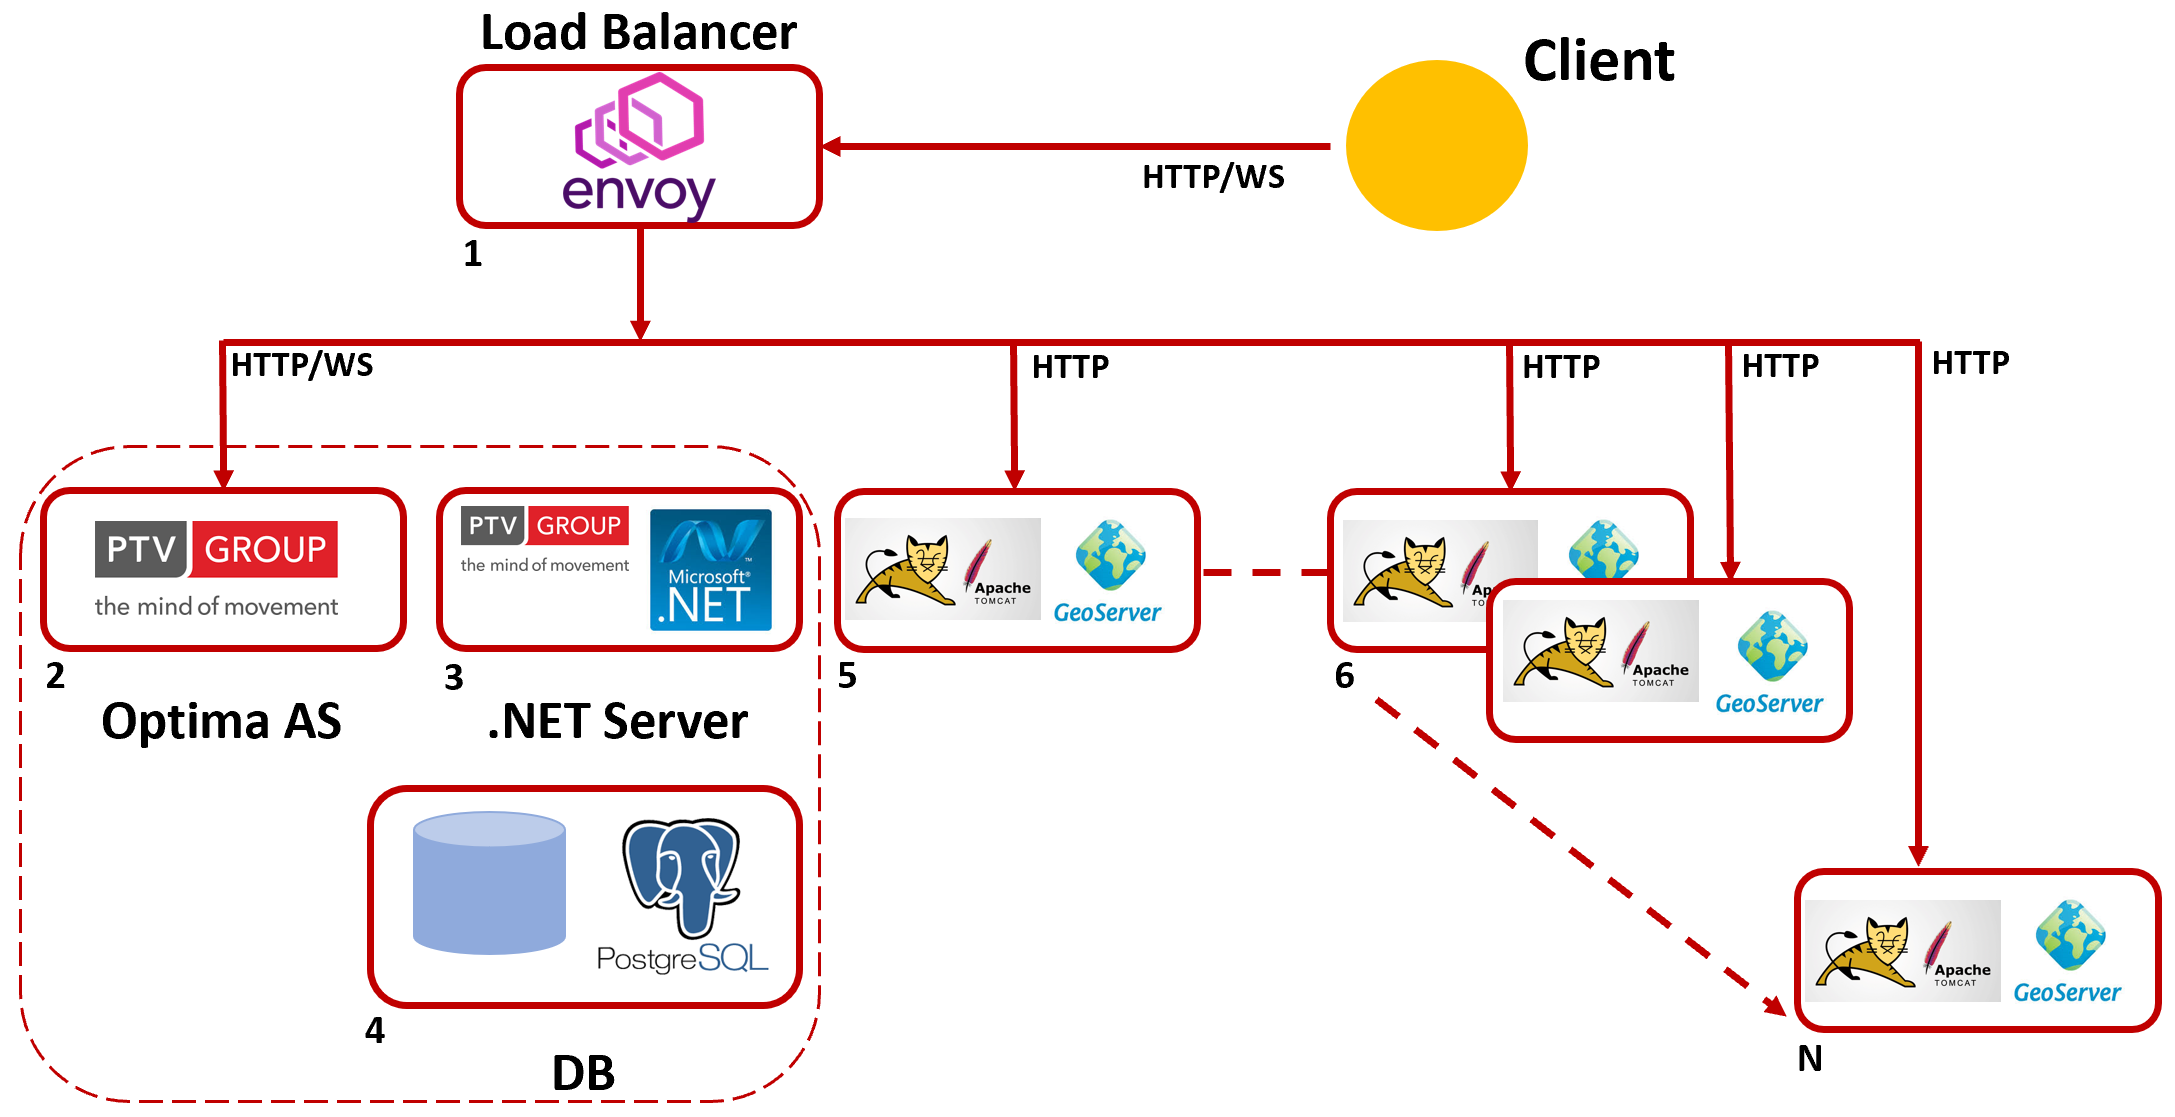
The machines 2,3 and 4 are installed according to → Installing Optima on three servers.
If Optima runs into a Demilitarized Zone (DMZ), you can avoid to install JBoss (WildFly) to support Optima WSI.
This schema can be extended to other machines. Every further machine can host a Docker container hosting from one up two GeoServer instances.
The installation of a scalable architecture according with the Option 1, can proceed as indicated in the list:
- Install Optima, on machines 2,3 and 4, according to → Installing Optima on three servers.
- On the machine 2 (WildFly), install Geoserver.
-
On machine 5, install Geoserver.
 Installing GeoServer
This component must be installed on a Linux server machine.
- Execute:
unzip C:\optima_zip\/ptv-optima-zip-vv.n.xxxxx.zip -
Execute:
cd C:\optima_zip\/ptv-optima-vv.n.xxxxx/optima_install/Docker/geoserverIn this folder you find two main elements:
- config.env: configuration file used to configure your gateway proxy.
- run.sh: script for running geoserver.
-
With a text editor open the file config.env.
In this file you must specify the environment variabels used by the GeoServer container:
DB_NAME=optima DB_HOST=localhost DB_PORT=5432 DB_USER=postgres PG_PASSWORD=postgres GEOSERVER_DATA_DIR=/usr/local/tomcat/conf/geoserver_data -
If you have an internet connection you can pull the GeoServer image from our Azure registry:
-
Execute:
docker login oaasregistry.azurecr.
With:
- User: oaasregistry
- Password: one of the password that you find on Azure Portal in the resource oaasregistry
-
./run.sh <geoserver_data folder absolute path>
The command downloads the image from the registry and run it.
Important: The script run.sh needs the geoserver_data folder path.
GeoServer is running.
-
Important: The timezone of the GeoServer docker image is set to CET by default and you need to change it to be synchronized with your DB and also with the time of ALL the other machines of the cluster.
- Execute:
-
On machine 5, install Optima WSI.
Installing Optima WSI
Optima WSI is an Optima component used for authentication features (see → OptimaWSI).
- Install Optima AS as described in → Installing the Application Server (AS) on a Linux server.
-
In the folder /opt/ptv-optima-as/standalone/deployments, delete all .war modules, excepted:
- geoserver.war
- optima-wsi.war
- For every additional machine (6, 7, ...), repeat steps 3 and 4.
-
On machine 1, install Envoy Proxy.
Installing Envoy Proxy
This component must be installed on a Linux server machine.
- Execute:
unzip C:\optima_zip\/ptv-optima-zip-vv.n.xxxxx.zip -
Execute:
cd C:\optima_zip\/ptv-optima-vv.n.xxxxx/optima_install/Docker/envoyproxyIn this folder you find three main elements:
- envoy.yaml: configuration file used to configure your gateway proxy.
- certs/: folder hosting the TLS certificates.
- run_envoy.sh: script for running the gateway proxy.
Tip: You can ignore the sample certificates hosted in the folder certs/.
- With a text editor open the file envoy.yaml.
-
Edit the file replacing the labels:
- $GEOSERVER_HOST1
- $GEOSERVER_HOST2
- $AS_HOST
with the corresponding IP addresses.
.... clusters: - name: geoserver .... endpoints: - lb_endpoints: - endpoint: { address: { socket_address: { address: $GEOSERVER_HOST1, port_value: 8080 } }} - endpoint: { address: { socket_address: { address: $GEOSERVER_HOST2, port_value: 8080 } }} health_checks: .... load_assignment: cluster_name: local_service endpoints: - lb_endpoints: - endpoint: { address: { socket_address: { address: $AS_HOST, port_value: 8080 } }}xxx .... -
If there are more than two instances of geoserver running, just add them under the previous block:
.... clusters: - name: geoserver .... endpoints: - lb_endpoints: - endpoint: { address: { socket_address: { address: $GEOSERVER_HOST1, port_value: 8080 } }} - endpoint: { address: { socket_address: { address: $GEOSERVER_HOST2, port_value: 8080 } }} ................ - endpoint: { address: { socket_address: { address: $GEOSERVER_HOSTn, port_value: 8080 } }} - endpoint: { address: { socket_address: { address: $GEOSERVER_HOSTn+1, port_value: 8080 } }} .... -
Select your certificates and put them in the certs/ folder.
Tip: You can ignore the certificates that are stored in the certs/ folder.
-
Execute:
./run_envoy.sh <envoy.yaml absolute_path> <certs folder absolute_path>Envoy is running.
- Execute:
When GeoServer runs on a WildFly machine, you need to change the number of connection to the connection pool.
You can set this property in the file:
ptv-optima-vv.n.xxxxx/ptv-optima-as/standalone/configuration/standalone.xml
The interesting fragment this file is shown below:
                            <server xmlns="urn:jboss:domain:4.2">
....
    <profile>
        <subsystem xmlns="urn:jboss:domain:logging:3.0">..
........
        </subsystem>
        <subsystem xmlns="urn:jboss:domain:datasources:4.0">
            <datasources>
                <datasource jndi-name="java:jboss/datasources/optima" pool-name="optima_pool" enabled="true" use-java-context="true">
                    <connection-url>jdbc:postgresql_postGIS://${env.DB_HOST:localhost}:${env.DB_PORT:5432}/${env.DB_NAME:optima}</connection-url>
                    <driver-class>org.postgis.DriverWrapper</driver-class>
                    <driver>postgis</driver>
                    <pool>
                        <min-pool-size>${env.MIN_POOL_SIZE:30}</min-pool-size>
                        <max-pool-size>${env.MAX_POOL_SIZE:80}</max-pool-size>
                        <prefill>true</prefill>
                    </pool>
                    <security>
                        <user-name>${env.DB_USER:postgres}</user-name>
                        <password>${env.PGPASSWORD:postgres}</password>
                    </security>
....................
        </subsystem>
    </profile>
....
</server>
The original values for min-pool-size and max-pool-size are:
<min-pool-size>${env.MIN_POOL_SIZE:30}</min-pool-size>
<max-pool-size>${env.MAX_POOL_SIZE:80}</max-pool-size>
You must update it as shown:
<min-pool-size>${env.MIN_POOL_SIZE:15}</min-pool-size>
<max-pool-size>${env.MAX_POOL_SIZE:30}</max-pool-size>
The installation of a scalable architecture according with the Option 2, can proceed as indicated in the list:
- Install Optima, on machines 2,3 and 4, according to → Installing Optima on three servers.
- On machine 5, install Docker.
-
On machine 5, install Geoserver.
Installing GeoServer
This component must be installed on a Linux server machine.
- Execute:
unzip C:\optima_zip\/ptv-optima-zip-vv.n.xxxxx.zip -
Execute:
cd C:\optima_zip\/ptv-optima-vv.n.xxxxx/optima_install/Docker/geoserverIn this folder you find two main elements:
- config.env: configuration file used to configure your gateway proxy.
- run.sh: script for running geoserver.
-
With a text editor open the file config.env.
In this file you must specify the environment variabels used by the GeoServer container:
DB_NAME=optima DB_HOST=localhost DB_PORT=5432 DB_USER=postgres PG_PASSWORD=postgres GEOSERVER_DATA_DIR=/usr/local/tomcat/conf/geoserver_data -
If you have an internet connection you can pull the GeoServer image from our Azure registry:
-
Execute:
docker login oaasregistry.azurecr.
With:
- User: oaasregistry
- Password: one of the password that you find on Azure Portal in the resource oaasregistry
-
./run.sh <geoserver_data folder absolute path>
The command downloads the image from the registry and run it.
Important: The script run.sh needs the geoserver_data folder path.
GeoServer is running.
-
Important: The timezone of the GeoServer docker image is set to CET by default and you need to change it to be synchronized with your DB and also with the time of ALL the other machines of the cluster.
- Execute:
- For every additional machine (6, 7, ...), repeat steps 2 and 3.
-
On machine 1, install Envoy Proxy.
Installing Envoy Proxy
This component must be installed on a Linux server machine.
- Execute:
unzip C:\optima_zip\/ptv-optima-zip-vv.n.xxxxx.zip -
Execute:
cd C:\optima_zip\/ptv-optima-vv.n.xxxxx/optima_install/Docker/envoyproxyIn this folder you find three main elements:
- envoy.yaml: configuration file used to configure your gateway proxy.
- certs/: folder hosting the TLS certificates.
- run_envoy.sh: script for running the gateway proxy.
Tip: You can ignore the sample certificates hosted in the folder certs/.
- With a text editor open the file envoy.yaml.
-
Edit the file replacing the labels:
- $GEOSERVER_HOST1
- $GEOSERVER_HOST2
- $AS_HOST
with the corresponding IP addresses.
.... clusters: - name: geoserver .... endpoints: - lb_endpoints: - endpoint: { address: { socket_address: { address: $GEOSERVER_HOST1, port_value: 8080 } }} - endpoint: { address: { socket_address: { address: $GEOSERVER_HOST2, port_value: 8080 } }} health_checks: .... load_assignment: cluster_name: local_service endpoints: - lb_endpoints: - endpoint: { address: { socket_address: { address: $AS_HOST, port_value: 8080 } }}xxx .... -
If there are more than two instances of geoserver running, just add them under the previous block:
.... clusters: - name: geoserver .... endpoints: - lb_endpoints: - endpoint: { address: { socket_address: { address: $GEOSERVER_HOST1, port_value: 8080 } }} - endpoint: { address: { socket_address: { address: $GEOSERVER_HOST2, port_value: 8080 } }} ................ - endpoint: { address: { socket_address: { address: $GEOSERVER_HOSTn, port_value: 8080 } }} - endpoint: { address: { socket_address: { address: $GEOSERVER_HOSTn+1, port_value: 8080 } }} .... -
Select your certificates and put them in the certs/ folder.
Tip: You can ignore the certificates that are stored in the certs/ folder.
-
Execute:
./run_envoy.sh <envoy.yaml absolute_path> <certs folder absolute_path>Envoy is running.
- Execute:
GeoServer accesses to the Optima DB using the JNDI name.
Wildfly and Tomcat use two different syntax for accessing the DB.
In Option 2, for Tomcat, you have to open the file:
ptv-optima-vv.n.xxxxx/ptv-optima-as/standalone/configuration/geoserver_data/workspaces/optima/tdwPostgres/datastore.xml
                            <dataStore>
    <id>DataStoreInfoImpl--9118bc2:1492d3d2fb9:-8000</id>
    <name>tdwPostgres</name>
    <type>PostGIS (JNDI)</type>
    <enabled>true</enabled>
    <workspace>
        <id>WorkspaceInfoImpl-22374cc7:1473457aa8a:-7fff</id>
    </workspace>
    <connectionParameters>
        <entry key="preparedStatements">false</entry>
        <entry key="Estimated extends">true</entry>
        <entry key="fetch size">1000</entry>
        <entry key="encode functions">false</entry>
        <entry key="jndiReferenceName">java:jboss/datasources/tdwPostgres</entry>
        <!-- <entry key="jndiReferenceName">java:comp/env/jdbc/datasources/tdwPostgres</entry> -->
        <entry key="Expose primary keys">true</entry>
        <entry key="Support on the fly geometry simplification">true</entry>
        <entry key="dbtype">postgis</entry>
        <entry key="Loose bbox">true</entry>
        <entry key="Primary key metadata table">gt_pk_metadata</entry>
        <entry key="namespace">http://optima.sistemaits.com</entry>
    </connectionParameters>
    <__default>false</__default>
</dataStore>
You have simply select the key jndiReferenceName, used by WildFly, and comment it; therefore, uncomment the one below.
In both options, if you have ONLY ONE NODE (machine 5), you can maintain the DB connections as before.
If you have TWO NODES (machine 5 and 6) or more, you must update the limit of connections and the amount of shared buffer.
The new values are:
- max_connection=300
- shared_buffer=1/4 of the total available RAM
These parameters are stored into the file postgresql.conf.
The location of the file is OS dependent; generally you can find it here:
/var/lib/pgsql/14/data/postgresql.conf
You can get its position using the SQL command:
psql -U postgres -h 127.0.0.1 -p 5432 -c 'SHOW config_file'